
How to Password Protect Google Docs (Google Won't Tell You This)

Co-founder at Peony — I built the data room platform, with a background in document security, file systems, and AI.
Connect with me on LinkedIn! I want to help you :)Last updated: March 2026
I run Peony, a data room platform, and I deal with Google Docs security questions almost daily from founders, lawyers, and M&A teams. The question is always some version of: "How do I slap a password on this Google Doc before sending it to investors?"
Here is the honest answer I give every time: Google Docs does not have a native password protection feature. Not on free accounts, not on Workspace Business, not even on Enterprise. Google confirmed this in their own help forums years ago, and it has not changed in 2026. Google's security model is account-level authentication plus permission-based sharing — no document passwords.
That does not mean you are stuck. I have tested every workaround over the past two years — from restricted sharing to Client-Side Encryption to encrypted PDF exports to secure data rooms — and some work genuinely well depending on what you are actually trying to protect.
Verdict: Google Drive's restricted sharing is fine for low-stakes internal docs. For anything sensitive — investor decks, legal documents, M&A materials, client deliverables — you need a password gate, view tracking, and revocation. Peony (free, $0) is the only method that combines password-gated links, per-page view analytics, dynamic watermarking, screenshot protection, and instant access revocation. With the average data breach costing $4.88 million in 2024 and human error driving 60-68% of incidents (Verizon DBIR), the ROI on proper document security is clear.
Quick guide — pick the method that matches the stakes:
- Internal team sharing with known Google accounts? Restricted sharing (free) — Method 1
- Workspace user who needs time-limited access? Link expiration (paid) — Method 2
- Enterprise org that needs Google-controlled encryption? Client-Side Encryption — Method 3
- One-time handoff where a file password is enough? Export and encrypt — Method 4
- Emailing a Doc and want light friction? Gmail confidential mode — Method 5
- Investor decks, legal docs, M&A materials — anything where a leak has real consequences? Peony — password gates, per-page tracking, watermarks, and instant revocation — Method 6
Why Google Docs has no password protection
Google has never offered document-level password protection, and there is no indication it is coming. I have watched the feature request threads since 2019 — they are long, frustrated, and consistently met with "this isn't available."
Google Docs' architecture is built around account-level authentication — your Google account login plus optional two-factor authentication — combined with permission-based sharing. When you share a Google Doc, you choose between:
- Restricted — only people you explicitly add (by email) can access
- Anyone with the link — anyone who has the URL can view, comment, or edit
- Anyone in your organization — for Google Workspace accounts, limits access to your domain
None of these include a password prompt. If you need recipients to enter a password before viewing the document, Google Docs simply cannot do it.
How Google Docs actually get exposed
Most leaks are not sophisticated attacks. They are predictable side effects of casual sharing — and I have seen every one of these in real fundraising workflows:
-
"Anyone with the link" sharing. Convenient, but effectively anonymous. That link gets pasted into Slack, forwarded in email threads, and quietly lives in places you never intended. Without identity-bound access, you lose control of distribution. For a full breakdown of this risk, see our secure file sharing guide.
-
Forwarding chains. You share with one investor. They forward the link to their analyst. The analyst shares with two associates. Now people you have never met have live access to your financial model. I have personally had this happen during a fundraising round — we only found out when someone referenced specific numbers from a document we thought was restricted.
-
Autocomplete errors. You type a name, pick the wrong person, or CC the wrong email. Verizon's DBIR data shows "misdelivery" is a major driver of breaches.
-
Permission inheritance. As of September 2025, Google made permission inheritance mandatory for shared folders. Individual files always inherit parent folder permissions. You can no longer share a folder with someone and selectively hide specific files. This caught several teams off guard.
-
Copy, download, and screenshot. Anyone with view access can screenshot, photograph, or manually retype the content. Disabling the download button is friction, not security.
When someone says "I want to password protect this Google Doc," what they actually mean is: "Only the right people see this. There is a gate in front. I can see who opened it. I can turn it off when the deal closes." That is the bar we should design for.
Google Docs' built-in security (what you actually get)
Before the workarounds, here is what Google provides natively. The gap between free and paid is larger than most people realize:
| Feature | Free Account | Workspace ($7-22+/user/mo) | Enterprise Plus |
|---|---|---|---|
| AES-256 encryption at rest | Yes | Yes | Yes |
| Two-factor authentication | Yes | Yes | Yes |
| Restricted sharing by email | Yes | Yes | Yes |
| Disable download/copy/print | Viewers only | Viewers only | All roles via DLP |
| Link expiration dates | No | Yes | Yes |
| Activity dashboard (who viewed) | No | Docs/Sheets only | Yes |
| Data Loss Prevention (DLP) | No | No | Yes |
| Client-Side Encryption (CSE) | No | No | Enterprise Plus only |
| Audit logs | No | Basic | Full |
Key caveat: Google retains all encryption keys. Files are encrypted with AES-256 at rest and TLS in transit, but Google can decrypt and access your files if required by law. Only Client-Side Encryption (Enterprise Plus only) puts encryption keys in your hands.
6 methods to password protect Google Docs
Method 1: Restricted sharing with download controls (free)
The simplest approach — share Google Docs only with specific Google accounts and disable downloads. This is what I default to for everyday internal team documents.
How to do it:
- Open the Google Doc and click Share
- Set General access to Restricted
- Add specific email addresses
- Choose permission level (Viewer, Commenter, Editor)
- Click the gear icon in sharing settings and uncheck "Viewers and commenters can see the option to download, print, and copy"
Pros: Free, built-in, recipients must authenticate with their Google account. Disabling downloads adds friction against casual redistribution. Enhanced IRM (launched January 2025, expanded July 2025) extends restrictions to Editors on Enterprise plans. For stronger screenshot protection, a dedicated platform is needed.
Cons: Not password-gated — anyone logged into an added account gets in. Recipients need Google accounts. No per-page engagement tracking on free accounts. Cannot prevent screenshots or manual retyping. As of September 2025, you cannot restrict individual files within shared folders due to mandatory permission inheritance.
Best for: Low-sensitivity internal sharing with known contacts who have Google accounts. This is our go-to for team meeting notes, project documentation, and non-confidential collaboration.
Method 2: Link expiration (Workspace only)
Automatically revoke access after a set date. Useful, but only available on paid Google Workspace plans.
How to do it:
- Share the Google Doc with specific people
- Click the expiration date option next to the user's name
- Set the date (default: 30 days from sharing)
Important: This feature is not available on free personal Google accounts. It requires a paid Google Workspace plan. As of November 2025, folder-level expiration is available for Viewers and Commenters in shared drives.
Pros: Automated access cleanup. Pairs well with restricted sharing for time-bound projects, fundraising rounds, and due diligence periods.
Cons: Users can download files before expiration and retain copies permanently. Expiration works per-user, not per-link. Cannot set expiration on Editor access for folders. The expiration only cuts off future access — it does not recall anything already downloaded or copied.
Best for: Workspace teams that need time-limited access for data rooms, project collaborations, or board document reviews. Pair with Method 1 for basic security.
Method 3: Client-Side Encryption (Enterprise only)
For regulated environments where you need encryption keys under your own control, not Google's.
How to do it:
- Your Google Workspace admin must set up CSE with a supported third-party key service — see the Workspace CSE overview
- Once enabled, users can create client-side encrypted Docs, Sheets, and Slides
- Content is encrypted in the browser before reaching Google's servers
Pros: Google cannot decrypt your documents, even if required by law or subpoena. Strong for compliance-driven industries (finance, healthcare, legal). Available for Docs, Sheets, Slides, and Drive files.
Cons: Requires Enterprise Plus or Education Plus — the most expensive Workspace tier. Requires admin setup with a third-party key management service. Does not add a password prompt for recipients. Limited collaboration features on encrypted documents. Not designed as a lightweight external sharing solution for founders or small teams.
Best for: Enterprise organizations with compliance requirements (HIPAA, SOX, FINRA) that need organization-controlled encryption. Not practical for startups or small businesses sharing investor updates.
Method 4: Export as password-protected PDF or Word file
Because Google Docs has no built-in password dialog, many guides recommend exporting and encrypting the file itself. This is a legitimate approach for one-time handoffs.
How to do it:
- In Google Docs, go to File and then Download and then PDF Document (or Microsoft Word)
- For PDF: Open in Adobe Acrobat and go to File and then Protect and then Encrypt with Password. Free alternatives: SmallPDF, iLovePDF (online tools), or macOS Preview
- For Word: Open in Microsoft Word and go to File and then Info and then Protect Document and then Encrypt with Password
- Set a strong password (12+ characters, mix of types)
- Upload to Google Drive or share directly
- Send the password through a separate channel — text, phone call, or a different messaging app. Never include it in the same email thread as the file
Pros: Real encryption at rest — the file is genuinely unreadable without the password. Works with standard PDF readers and Office apps. No special software needed on the recipient's end.
Cons: Static snapshot — does not sync with updates to the original Google Doc. No view tracking or per-page analytics. No access revocation once the file is shared. Must manage passwords separately for each file. We tried this approach for investor updates once — managing different passwords for different investors across multiple files became unworkable within two weeks.
Best for: One-time file handoffs where you need encryption at rest but do not need tracking, revocation, or a living document link. Tax documents, signed contracts, archive copies. For batch encryption of multiple files, see our guide to password protecting multiple PDFs at once.
Method 5: Gmail confidential mode (light friction)
Gmail's confidential mode can add friction to the sharing process. It is a speed bump, not a vault.
How to do it:
- In Gmail, compose a new email
- Click the lock-and-clock icon (confidential mode) at the bottom of the compose window
- Set an expiration date
- Optionally require an SMS passcode for the recipient to open the email
- Attach or link the Google Doc
Pros: Limits forwarding, printing, and downloading within the Gmail interface. Expiration removes access automatically. SMS passcode adds an authentication step. Available on all Gmail accounts for free.
Cons: Multiple security reviews and Google's own documentation are clear: confidential mode does not provide end-to-end encryption. Recipients can still screenshot or photograph the content. The restrictions only apply within Gmail — if the content is accessed another way, the controls vanish. Attachments in confidential emails are stored on Google's servers, not encrypted with your keys.
Best for: Adding a small speed bump when emailing sensitive Google Docs to external parties. Use as one layer in a stack, never as your only protection. For genuine screenshot protection and watermarking, you need a dedicated platform.
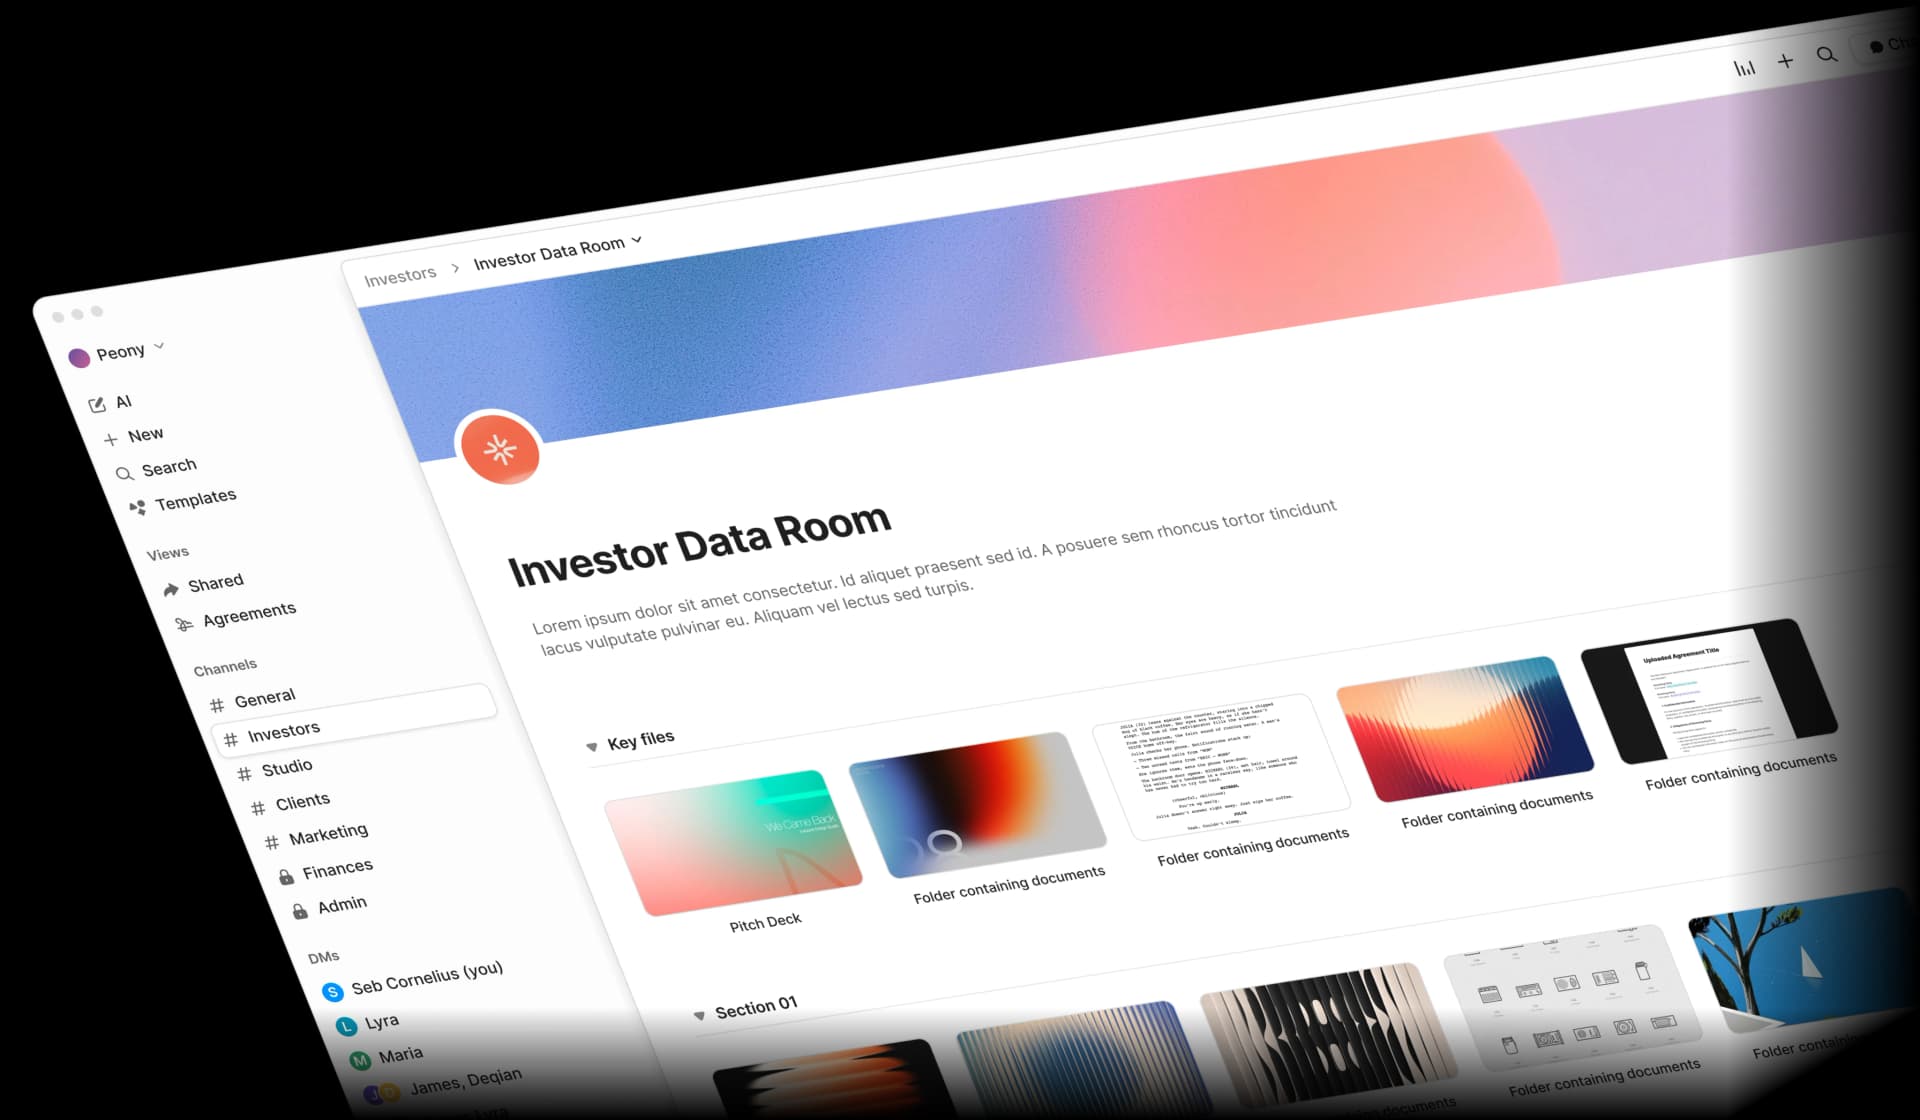
Method 6: Share through a secure data room (Peony)
For business use cases — investor decks, legal documents, M&A due diligence, fundraising memos, client deliverables — this is where I ended up after testing everything above.
The core problem with Methods 1 through 5 is the same blind spot: once someone has the file or link, you lose visibility and control. Did your investor forward the pitch deck? Did a vendor share the pricing sheet with a competitor? You will not know until the damage surfaces.
We learned this the hard way when a Workspace admin on our team ran a sharing audit and found that a confidential board strategy doc — a Google Doc shared with three executives — had somehow been accessed by eleven people across four departments. Nobody had malicious intent. One exec shared it with their chief of staff, who shared it with a project lead, who dropped it into a shared Drive folder. Permission inheritance did the rest. The document had been quietly accessible to the entire folder's membership for two months before anyone noticed.
That is when we moved sensitive external sharing to Peony. The difference is fundamental — instead of discovering exposure after the fact, you see every viewer in real time and can cut access the moment something looks wrong.
How to do it:
- Finalize your Google Doc. Clean up the content. For external sharing, export as PDF (File and then Download and then PDF Document) so layout is locked
- Create a data room in Peony. Name it by context: "Series A — Financial Model," "Client — Master Services Agreement," "Board — Q1 Strategy Memo"
- Upload the exported file. Peony supports PDF, Word, Excel, PowerPoint, and 30+ other formats
- Set access controls. Grant access to specific emails or trusted domains using identity-bound access. Set external users to view-only by default. Disable downloads so recipients view in Peony's secure viewer instead of saving local copies
- Add a passcode. For an additional layer, add a password gate to the Peony link. Recipients must both be verified and enter the passcode before seeing any content
- Enable watermarking. Turn on dynamic watermarks to stamp each viewer's name and email on every page — deterring screenshots and making leaks attributable
- Share one secure link. Send the Peony link in your email. If you update the Google Doc later, export a new version and replace the file behind the same link — everyone sees the latest version without a new URL
What you get that Google Docs cannot provide:
- Password-gated links — recipients enter a password before viewing
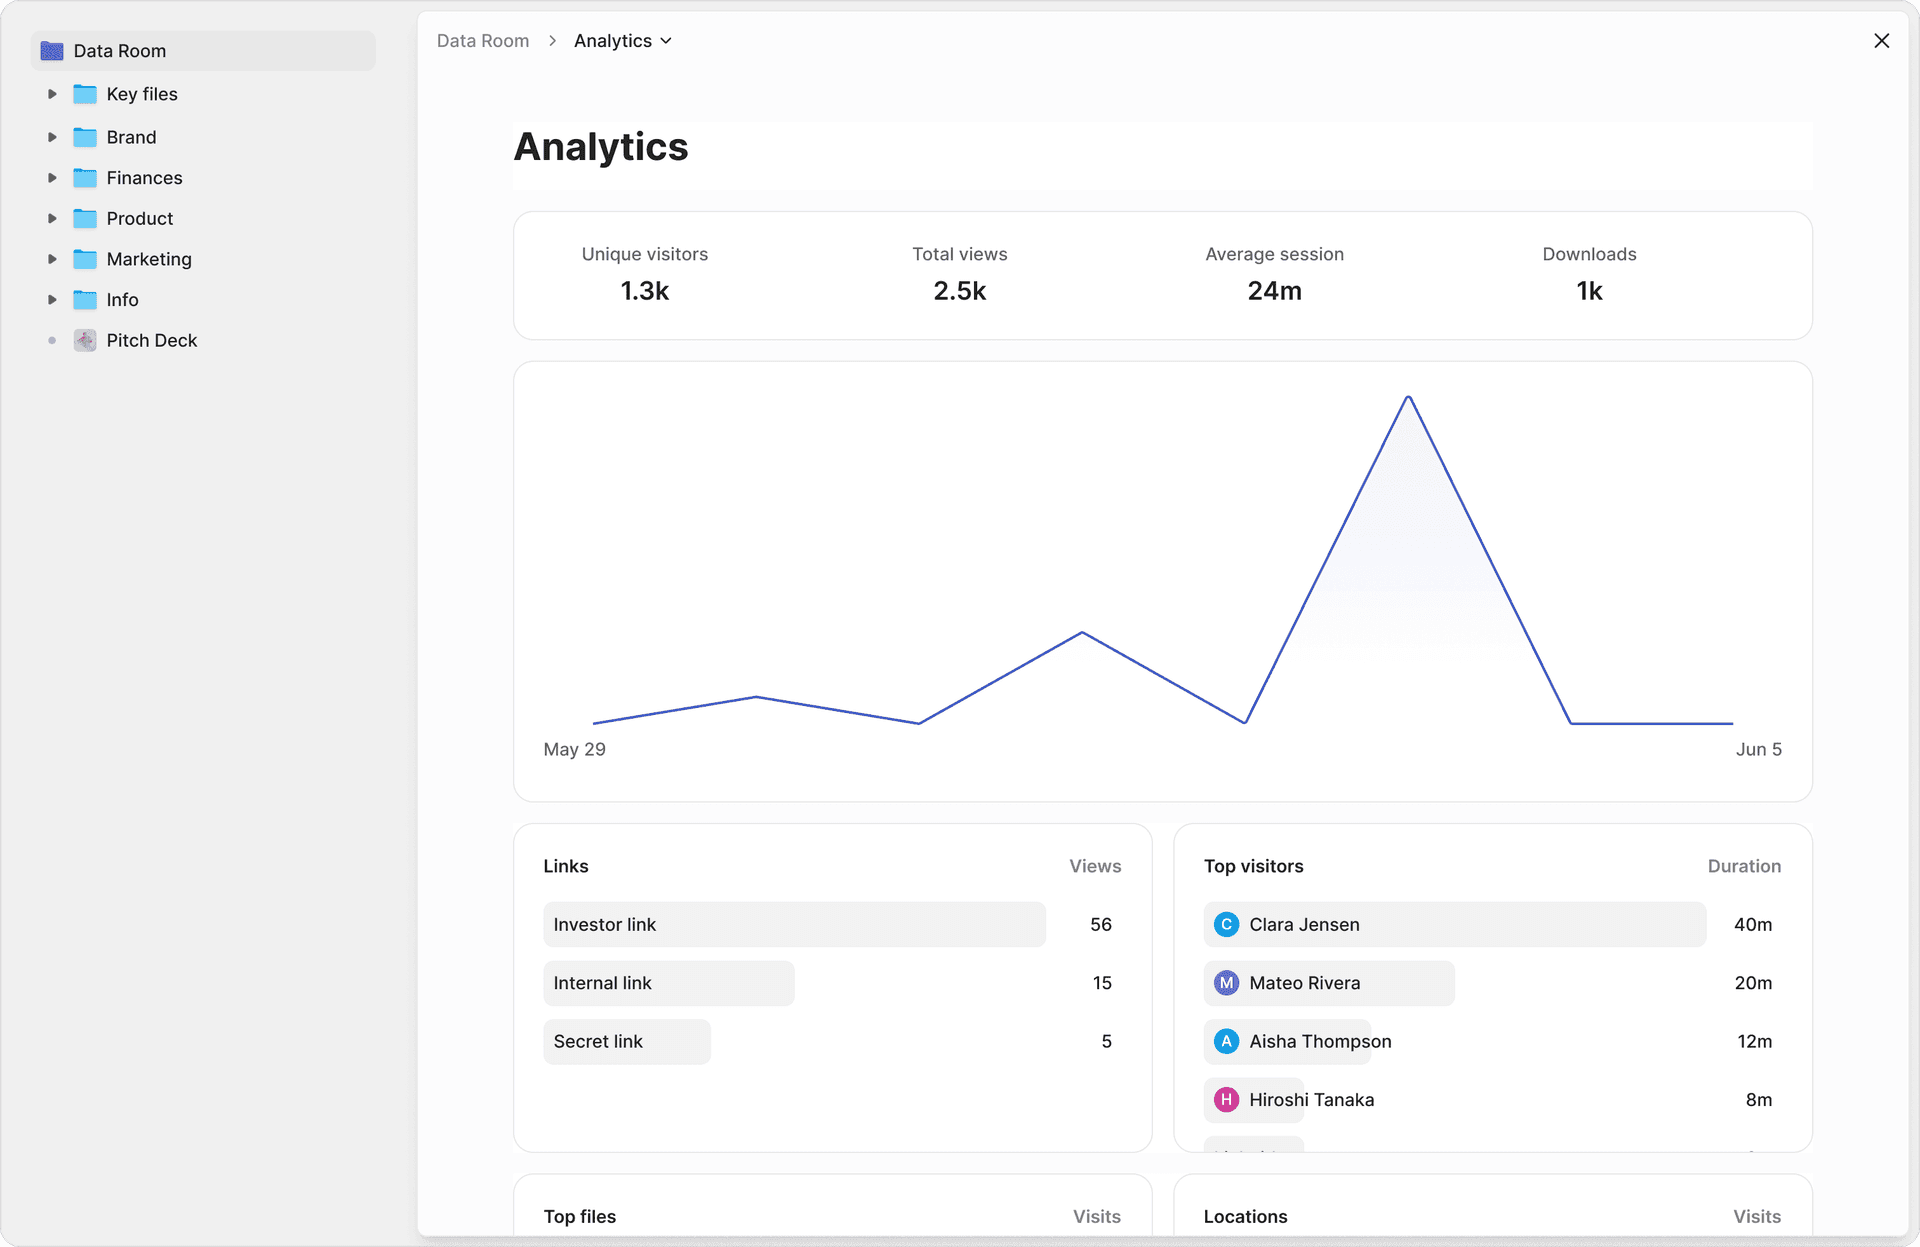
- Per-page view analytics — see who viewed what, when, and for how long
- Dynamic watermarking — viewer's name/email stamped on each page
- Screenshot protection — active interference with standard capture flows
- Access revocation — disable links instantly, even after someone has viewed
- Link expiration — automatic access cutoff on your schedule
- NDA/agreement gates — require legal acceptance before viewing
- Download controls — allow or prevent downloads per link
- 2FA — additional authentication layer
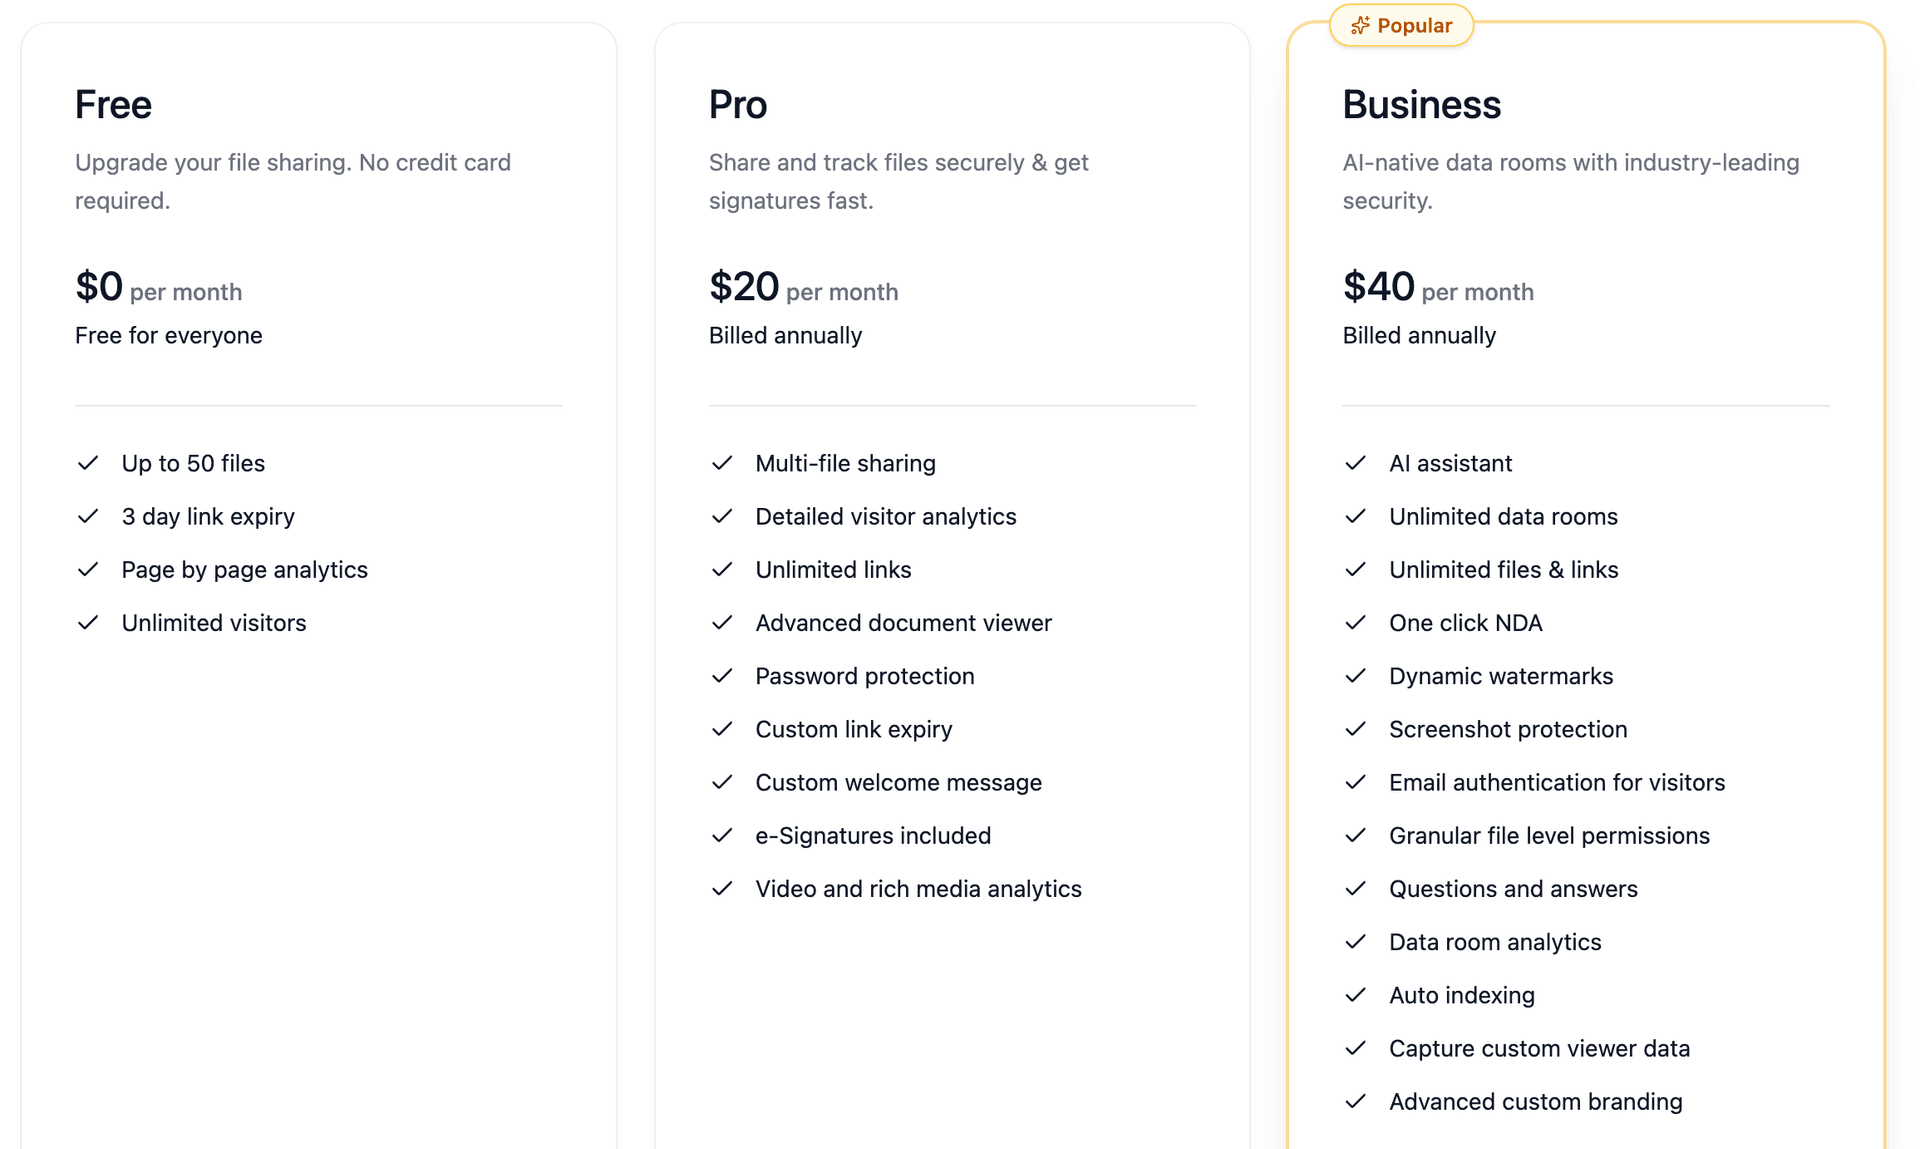
Peony starts free ($0, 2 GB), with Pro at $20/admin/month and Business at $40/admin/month for unlimited data rooms — making enterprise-grade security accessible to startups, founders, and lean teams. Traditional VDRs like Datasite ($1,000+/month) and Ideals ($600+/month) offer similar security but are built for enterprise M&A teams with six-figure budgets. Peony delivers the same security stack — AES-256 encryption, dynamic watermarks, complete audit trails, screenshot protection, 2FA — with AI-powered organization that sets up a data room in under 5 minutes.
Best for: External sharing of sensitive business documents — investor decks, legal materials, M&A due diligence, fundraising data rooms, client proposals — where you need password gates, tracking, watermarks, and audit trails. This is what we use for fundraising, M&A, and anything where a leak would actually hurt. For a deeper dive into investor-specific rooms, see our data room for investors guide.
Comparison table: all methods side by side
| Feature | Peony (Secure Platform) | Restricted Sharing | Link Expiration | Client-Side Encryption | PDF/Word Export | Gmail Confidential |
|---|---|---|---|---|---|---|
| Password gate | Yes | No | No | No | Yes (file-level) | SMS code only |
| Per-page analytics | Yes | Limited (Workspace) | No | No | No | No |
| Dynamic watermarks | Yes | No | No | No | No | No |
| Screenshot protection | Yes | No | No | No | No | No |
| Access revocation | Instant | Remove user | Auto-expire | Remove user | No (once shared) | Expire only |
| Download prevention | Yes | Partial (button only) | No | No | No (file is the share) | Partial |
| NDA gate | Yes | No | No | No | No | No |
| Encryption | AES-256 | AES-256 (Google keys) | AES-256 (Google keys) | AES-256 (your keys) | Varies by tool | Not E2E encrypted |
| Works without Google account | Yes | No | No | No | Yes | SMS required |
| Cost | Free–$40/admin/mo | Free–$22+/user/mo | Workspace only | Enterprise Plus only | Free–paid tools | Free |
My take: For everyday internal docs, Google's restricted sharing is fine. For anything you would be uncomfortable seeing forwarded — investor financials, deal terms, legal agreements, client data — you need the tracking and control that only Peony provides at an accessible price point. The gap between "I shared it" and "I know exactly who saw it and can cut them off" is the gap between hoping and knowing.
Google Docs security by the numbers
These statistics put the risk in context:
- $4.88 million — average cost of a data breach in 2024, with compromised credentials as the leading cause (IBM Cost of a Data Breach Report)
- 60-68% — percentage of breaches involving a human element: misdelivery, wrong permissions, social engineering (Verizon DBIR 2024-2025)
- 709,533 — average number of publicly exposed Google Drive assets containing sensitive data per company (DoControl, 2024)
- 40.2% — percentage of Google Drive files containing sensitive information across 6.5 million files scanned (Metomic, 2023)
- 22% — percentage of external Google Drive shares using open "anyone with the link" access (DoControl, 2024)
- 186,000 — sensitive assets per organization accessible to every internal user (DoControl, 2024)
- 0 — number of Google Docs plans that include document-level password protection
That first number — 709,533 exposed assets per company — is staggering. Most of these are not intentional shares. They are the accumulated result of years of "anyone with the link" defaults and permission creep that nobody audits.
Practical tips that actually prevent Google Docs leaks
Most Google Docs security failures are not sophisticated attacks. They are boring configuration mistakes — the same ones I have seen (and made) myself.
Audit your sharing settings quarterly. I started doing this after the fundraising incident. It takes about an hour, and every single time I find at least a few shares that should have been revoked months ago. Former vendors, completed project partners, departed team members — they all still have access unless you actively remove them.
Default to Restricted sharing. Make "Anyone with the link" the exception, not the rule. If you catch yourself reaching for it out of convenience, that is a signal the document needs a better sharing workflow — likely Peony or at minimum a more deliberate access structure.
Separate authoring and sharing in your head. Google Docs is where you write. Peony (or, at minimum, locked-down Drive sharing) is where you control. Keep the original Doc as your source of truth. Export and share the controlled version through a secure data room.
Send passwords on a separate channel. Whether you use Peony passcodes, encrypted PDFs, or any other password gate — never email the password in the same thread as the link. Use a text, phone call, or different messaging app. NIST's digital identity guidelines recommend long, unique passphrases over complex character requirements.
Set expiry dates on everything external. Fundraising rounds close. RFPs expire. Client engagements wrap up. Access should expire with them. Whether you use Workspace link expiration or Peony's link expiry, build expiration into your sharing workflow by default.
Turn on watermarking for sensitive content. Dynamic watermarks — the viewer's email stamped on every page — do not prevent screenshots, but they make leaks attributable. That alone changes behavior. I have noticed investors handle watermarked documents noticeably more carefully than unmarked ones. The U.K. National Cyber Security Centre recommends dynamic watermarking as one of the most effective practical deterrents.
Actually close doors. When deals, rounds, or employments end, revoke access using Peony's access management or Google Drive's sharing settings. DBIR data shows lingering access and human error are a massive driver of breaches. Closing old paths quietly moves you into the top tier of disciplined operators.
Bottom line
There is no magic "Password protect this Google Doc" button. You need the whole package: the right people in, the wrong people out, a gate, revocation, attribution, and one current source of truth.
Here is how I think about it:
- Low stakes, internal team — Google Docs restricted sharing with downloads disabled (free)
- Time-limited access for a deal or project — Add Workspace link expiration (paid)
- One-time PDF handoff — Export and encrypt the file (free)
- High stakes: investor decks, legal docs, M&A materials — Peony (password gates, per-page analytics, watermarks, screenshot protection, instant revocation)
The important thing is matching the security to the sensitivity. Do not over-engineer protection for a shared team folder, and do not share investor financials behind a Google Drive link with "anyone with the link" turned on.
If Google Docs' sharing controls are not enough for what you are protecting, try Peony for free — export your Doc as PDF, upload it, and share a password-gated link with per-page analytics and instant revocation in under two minutes.
Looking for a more secure alternative to Google Drive altogether? See our Google Drive alternatives comparison for 10 platforms that offer stronger access controls, better tracking, and real password protection.
FAQ
Can you password protect a Google Doc?
Google Docs does not have a native "enter password to open" feature. Google's security model relies on account-level authentication and permission-based sharing, not per-document passwords. To add a true password gate with view tracking, export your Doc as PDF, upload it to Peony (free, $0), and share via identity-bound links with an optional passcode. Peony provides page-level analytics, dynamic watermarking, screenshot protection, and instant access revocation — all features Google Docs lacks entirely.
What is the most secure way to share a Google Doc externally?
For maximum security, export the Google Doc as a PDF and share it through a secure data room like Peony. This gives you password-gated links, per-page view analytics, dynamic watermarking, download controls, and instant access revocation. Google Drive's native restricted sharing provides basic access control but no password gates, engagement tracking, or watermarks.
Can you see who viewed a Google Doc?
Google Docs shows a limited activity dashboard on paid Workspace plans — you can see who opened a document, but not which sections they read or how long they spent. Free Google accounts get almost no view tracking. Peony provides full page-level analytics: who opened the document, when, how long they viewed each page, and which sections received the most attention — critical for fundraising teams and M&A advisors tracking investor engagement.
How do I password protect a Google Doc without exporting it?
You cannot add a per-document password inside Google Docs. The closest native option is setting sharing to Restricted (specific people only) and enabling two-factor authentication on all accounts with access. For organizations on Enterprise Plus, Client-Side Encryption adds organization-controlled encryption keys. None of these add a password prompt before opening. For a true password gate, export the Doc and share through Peony, which supports passcodes, identity-bound access, and full audit trails starting free.
Is Google Docs Client-Side Encryption the same as password protection?
No. Google Workspace Client-Side Encryption (CSE) encrypts document content with keys your organization controls, so Google cannot decrypt it — but it does not add a password prompt for recipients. CSE is available only on Enterprise Plus and Education Plus plans and requires admin setup with a third-party key service. For a user-facing password gate that works with any Google Doc, Peony lets you export and share through password-protected links with per-page analytics, dynamic watermarking, and instant revocation.
Can you revoke access to a Google Doc after sharing it?
You can remove specific people from Google Drive sharing settings, but if they already downloaded, copied, or forwarded the content, you have no way to recall it. Peony provides true instant revocation: disable a link and all recipients lose access immediately, even if they viewed it before. Combined with download controls that prevent local copies, Peony gives you much stronger post-sharing control than Google Docs alone.
Does exporting a Google Doc as a password-protected PDF actually work?
Yes, it provides real encryption at rest. Export your Google Doc as PDF, then encrypt it with a strong password using Adobe Acrobat, Microsoft Word, or free tools like SmallPDF. The file is unreadable without the password. The limitation: once someone opens the PDF, they can save, forward, or screenshot it freely. You get no view tracking or access revocation. Peony solves this by combining password-gated links with per-page analytics, dynamic watermarking, and download restrictions in one platform.
What is the difference between Google Docs sharing and a data room?
Google Docs sharing controls who can access a document using Google account permissions. A data room like Peony wraps documents in a controlled viewing environment with password gates, per-page view analytics, dynamic watermarking, screenshot protection, NDA gates, download controls, and instant access revocation. The difference matters most for investor decks, legal documents, M&A due diligence, and any content where a leak has financial or legal consequences.
Is Gmail confidential mode a good way to protect Google Docs?
Gmail confidential mode adds light friction — it can limit forwarding, set expiry dates, and require SMS verification codes. But Google itself is clear that it does not provide end-to-end encryption, and recipients can still screenshot or photograph the content. Peony provides stronger protection: password-gated links, dynamic watermarking that deters screenshots by stamping each viewer's identity on every page, page-level analytics, and instant access revocation.
How much does it cost to password protect Google Docs with Peony?
Peony starts free at $0 with 2 GB of storage — enough to password protect and track a handful of Google Docs. Pro is $20 per admin per month, and Business is $40 per admin per month for unlimited data rooms with advanced analytics, custom branding, and NDA gates. Traditional virtual data rooms like Datasite charge $1,000 or more per month. Peony provides the same security stack — AES-256 encryption, dynamic watermarks, audit trails, screenshot protection — at file-sharing prices.
Related Resources
- How to Password Protect a Google Drive Folder
- How to Password Protect Google Sheets
- Protect Google Docs from Screenshots
- How to Password Protect Excel Files
- How to Password Protect PowerPoint
- How to Password Protect PDF Without Adobe
- How to Prevent PDF Forwarding
- Secure File Sharing Guide
- How to Protect PDFs from Screenshots
- Virtual Data Room Cost Guide
- Pricing
You might also like
Apr 7, 2026
How to Add Watermarks in Excel (3 Methods Compared) in 2026
Apr 1, 2026
How to Send a Password-Protected PDF (6 Methods, 1 Tracks Opens) in 2026
Apr 1, 2026
Is OneDrive Secure? (Honest Take From a Data Room Builder) in 2026