
How to Password Protect Files on Mac (5 Ways — 1 Tracks Access) in 2026

Co-founder and CEO at Peony. I built the data room platform with a background in document security, file systems, and AI. Founded Peony in 2021 in San Francisco.
Last updated: March 2026
If you are searching for this, you are probably not trying to hide a random photo.
You are thinking about real files — investor decks, contracts, HR folders, tax PDFs, customer exports, maybe an entire "work" directory that would be painful or risky if it leaked. This is the exact system I use on my Mac: FileVault for full-disk encryption, encrypted disk images for sensitive folders, and Peony for anything I share externally.
TL;DR — macOS ships with four solid methods for local file protection (FileVault, encrypted disk images, Preview PDF encryption, encrypted archives). All four are free and require no downloads. But none of them give you any visibility or control after you share a file — no tracking, no revocation, no watermarking. The IBM 2025 Cost of a Data Breach Report puts credential-related breaches at $4.67 million on average, and Verizon's 2025 DBIR found ~60% of breaches still involve the human element — lost devices, weak passwords, misdelivery. The average breach takes 241 days to identify. If your files leave your Mac, a password alone is not enough.
Password protecting files on Mac means encrypting or restricting access so that only people with the right key, password, or identity can open your content. macOS has strong built-in encryption — Apple uses XTS-AES-128 with a 256-bit key for FileVault on APFS volumes, and the Secure Enclave on Apple Silicon Macs handles all key operations in dedicated hardware.
But here is the gap: every built-in method protects files at rest on your Mac. The moment you email an encrypted PDF or share a ZIP password over Slack, you lose all control — see our secure file sharing guide for the full picture on why this matters. That is why I split my workflow into "local protection" (macOS built-in tools) and "sharing protection" (Peony — identity-bound access, password gating, page-level analytics, and one-click revocation).
This guide covers all five methods so you can pick what fits your situation. (On a Windows PC instead? See our Windows file protection guide.)
Quick Guide: 5 Methods Compared
| Method | Cost | Protects | Tracking | Revocation | Best For |
|---|---|---|---|---|---|
| FileVault | Free | Entire disk | No | No | Baseline for every Mac |
| Encrypted Disk Images | Free | Folders/bundles | No | No | Sensitive local folders |
| Preview PDF Encryption | Free | Individual PDFs | No | No | Quick single-file protection |
| Encrypted ZIP/7z | Free | File bundles | No | No | Cross-platform file delivery |
| Peony (secure sharing) | Free | Shared files | Per-viewer, per-page | Yes | Investor decks, client files, HR docs |
Method 1 — FileVault (Full-Disk Encryption)
This should be your starting point. FileVault encrypts your entire startup disk, so if your Mac is lost or stolen, data cannot be read without your login password or recovery key.
How to enable FileVault
- Open System Settings (or System Preferences on older macOS).
- Go to Privacy & Security → FileVault.
- Click Turn On FileVault.
- Choose how to unlock: iCloud account or a recovery key. I recommend saving the recovery key in a password manager.
- Encryption runs in the background — your Mac stays usable.
On Apple Silicon Macs (M1 through M4), the underlying storage is always encrypted at the hardware level. FileVault adds the user-key layer on top so that data cannot be decrypted without authentication at boot.
Pros
- Ships with every Mac, no downloads needed
- Uses XTS-AES-128 with a 256-bit key, the standard NIST recommends
- Negligible performance impact on Apple Silicon (encryption happens in the Secure Enclave)
- Protects against physical theft, lost devices, and unauthorized disk removal
Cons
- Protects data at rest only — does nothing for files you share
- No per-file granularity (it is all or nothing for the disk)
- If you forget your password and lose the recovery key, data is unrecoverable
Best for
Every Mac with real data. This is baseline security, not optional.
Method 2 — Encrypted Disk Images (Folder-Level Vaults)
When FileVault covers the whole disk but you want a separate password-protected container for a specific folder — say, "Investor Docs" or "HR Confidential" — encrypted disk images are the macOS answer.
How to create an encrypted disk image
- Open Disk Utility (Applications → Utilities → Disk Utility).
- Choose File → New Image → Blank Image (or Image from Folder if encrypting an existing folder).
- Name the image and choose a size (or leave it flexible with sparsebundle format).
- Under Encryption, select 128-bit AES or 256-bit AES.
- Under Image Format, choose sparse bundle disk image (grows as needed) or read/write disk image (fixed size).
- Set a strong password when prompted. Do not save it to Keychain if you want maximum isolation.
You now have a .dmg or .sparsebundle file. Double-click it, enter your password, and it mounts like a USB drive. Drag files in and out, then eject when done. Without the password, the contents are encrypted.
I keep a 256-bit AES sparsebundle called "Vault" on my Desktop for tax documents, legal contracts, and anything I would not want exposed if someone accessed my Mac while I stepped away. It takes about 30 seconds to set up.
Pros
- Built into macOS, no third-party software
- AES-256 option for maximum encryption strength
- Sparsebundle format grows dynamically (no wasted space)
- Works with Time Machine — the encrypted image stays encrypted in backups
Cons
- No access tracking or revocation after sharing (if you email the
.dmg, the password is the only gate) - Manual workflow: you must remember to eject the image when done
- File size limits with
.dmgformat (sparsebundle avoids this)
Best for
Sensitive local folders: financial records, legal documents, HR files, client data you are not sharing yet.
Method 3 — Preview PDF Encryption
For individual PDF documents, the built-in Preview app can add password protection without any extra software.
How to password protect a PDF in Preview
- Open the PDF in Preview.
- Go to File → Export.
- Check Permissions (or Encrypt depending on your macOS version).
- Check Require password to open document.
- Set a strong password and click Save.
The resulting PDF uses AES encryption and opens in any standard PDF reader across Mac, Windows, and mobile.
I used this for years before switching to Peony for anything I share externally. The limitation hit me when I emailed an encrypted pitch deck to a potential partner, shared the password over Slack, and then realized three months later that I had no idea whether they had forwarded it to anyone else — or how to stop them. See our full guide to protecting PDFs without Adobe for more options.
Pros
- Zero cost, zero downloads — ships with every Mac
- Output is a standard encrypted PDF that opens anywhere
- Simple three-step process
Cons
- One file at a time (no batch encryption — see our guide to batch PDF protection)
- No tracking: you cannot see who opened the PDF or when
- No revocation: once the password is shared, access is permanent
- Password can be forwarded alongside the file
Best for
Quick one-off protection for a single PDF you are storing locally or sharing with someone you fully trust.
Method 4 — Encrypted ZIP or 7z Archives
To bundle multiple files into one password-protected package — especially for cross-platform delivery — encrypted archives are the standard approach.
How to create an encrypted archive on Mac
Option A — Terminal (built-in, weaker encryption):
zip -er archive-name.zip /path/to/folder-or-files
This creates a password-protected ZIP using ZipCrypto encryption. It works everywhere, but ZipCrypto is considered weak by modern standards.
Option B — Keka or 7-Zip compatible app (stronger encryption):
- Download Keka (free from the website, paid on the Mac App Store).
- Drag your files onto the Keka window.
- Choose 7z or ZIP (AES-256) format.
- Set a strong password.
- Click Compress.
The AES-256 encrypted archive is significantly stronger than ZipCrypto and opens on any platform with 7-Zip or compatible tools.
See our complete guide to password protecting ZIP files for detailed instructions.
Pros
- Free (Terminal is built-in; Keka is free from the developer's website)
- Cross-platform: recipients on Windows, Mac, or Linux can open the archive
- Bundles multiple files and folders into one deliverable
Cons
- ZipCrypto (built-in
zipcommand) is weak — use AES-256 via Keka for real security - No tracking, no revocation, no watermarking
- You must share the password through a separate channel (and hope it is not forwarded)
- The recipient gets a full copy of the files — you cannot control what happens next
Best for
Cross-platform file delivery when the recipient specifically requests an encrypted archive and you accept the loss of control after sharing.
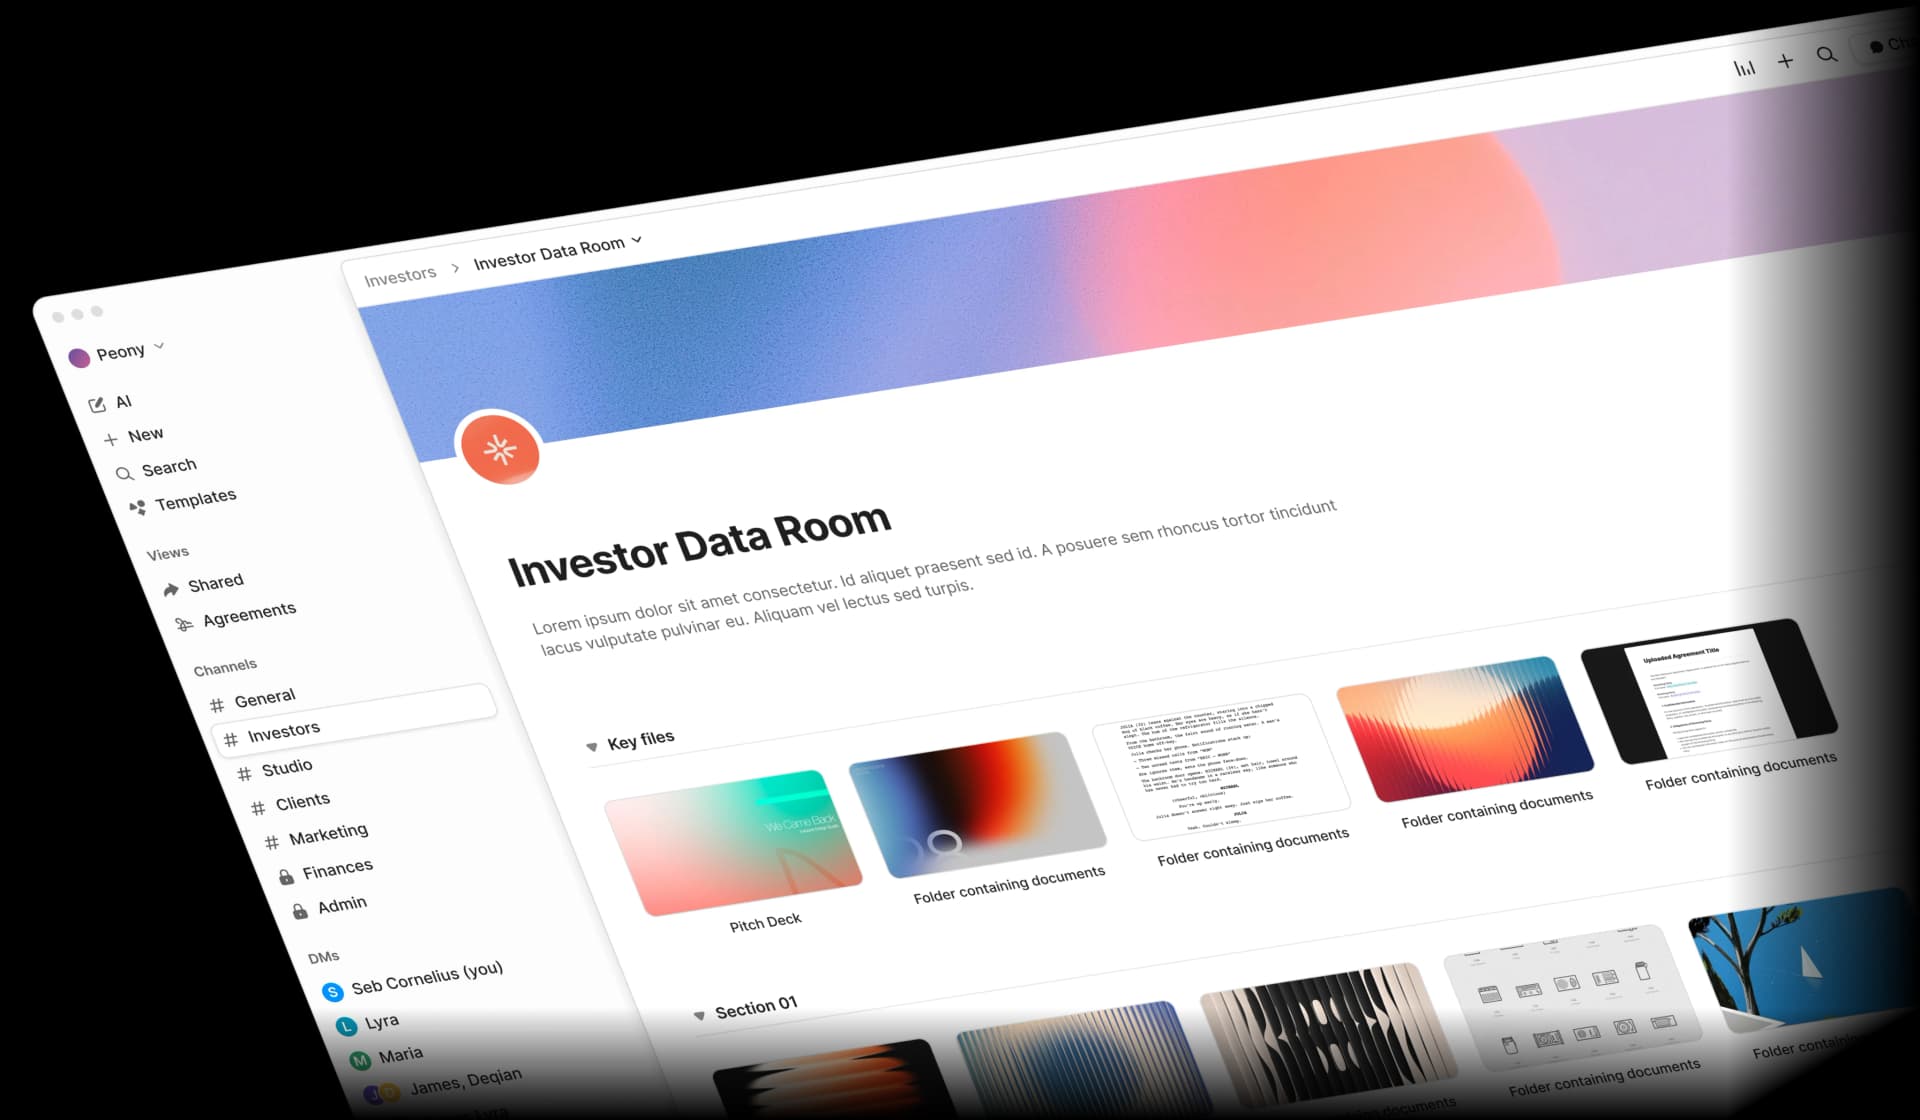
Method 5 — Peony (Secure Sharing With Tracking and Revocation)
The four methods above all protect files at rest on your Mac. They are solid for local security. But the moment you share a file — email it, Slack it, AirDrop it — the protection model breaks. The password becomes the only gate, you lose all visibility, and you cannot revoke access.
I built Peony to solve this exact gap. Think of it as your sharing perimeter: your Mac handles local encryption, and Peony handles everything that leaves your Mac.
Honest note: Peony is a secure data room, not a local Mac encryption tool. It does not replace FileVault or encrypted disk images. It replaces the part where you email raw files and hope for the best.
How to share files securely from your Mac with Peony
- Create a room in Peony — name it by context ("Investor Docs Q1 2026", "Client — Project Files", "HR Confidential").
- Upload files from your Mac (PDFs, Excel, PowerPoint, images, ZIPs — any format).
- Set access controls:
- Identity-bound access: only specific email addresses or domains can view
- Password gating: add a passcode on top of identity verification
- NDA gate: require a signed NDA before any document is visible
- Link expiry: access automatically ends after a deadline
- Screenshot protection: blocks and logs screenshot attempts
- Dynamic watermarks: the viewer's identity is stamped into every rendered frame
- Share one link via email, Slack, or any channel. Recipients verify their identity and enter the passcode to view.
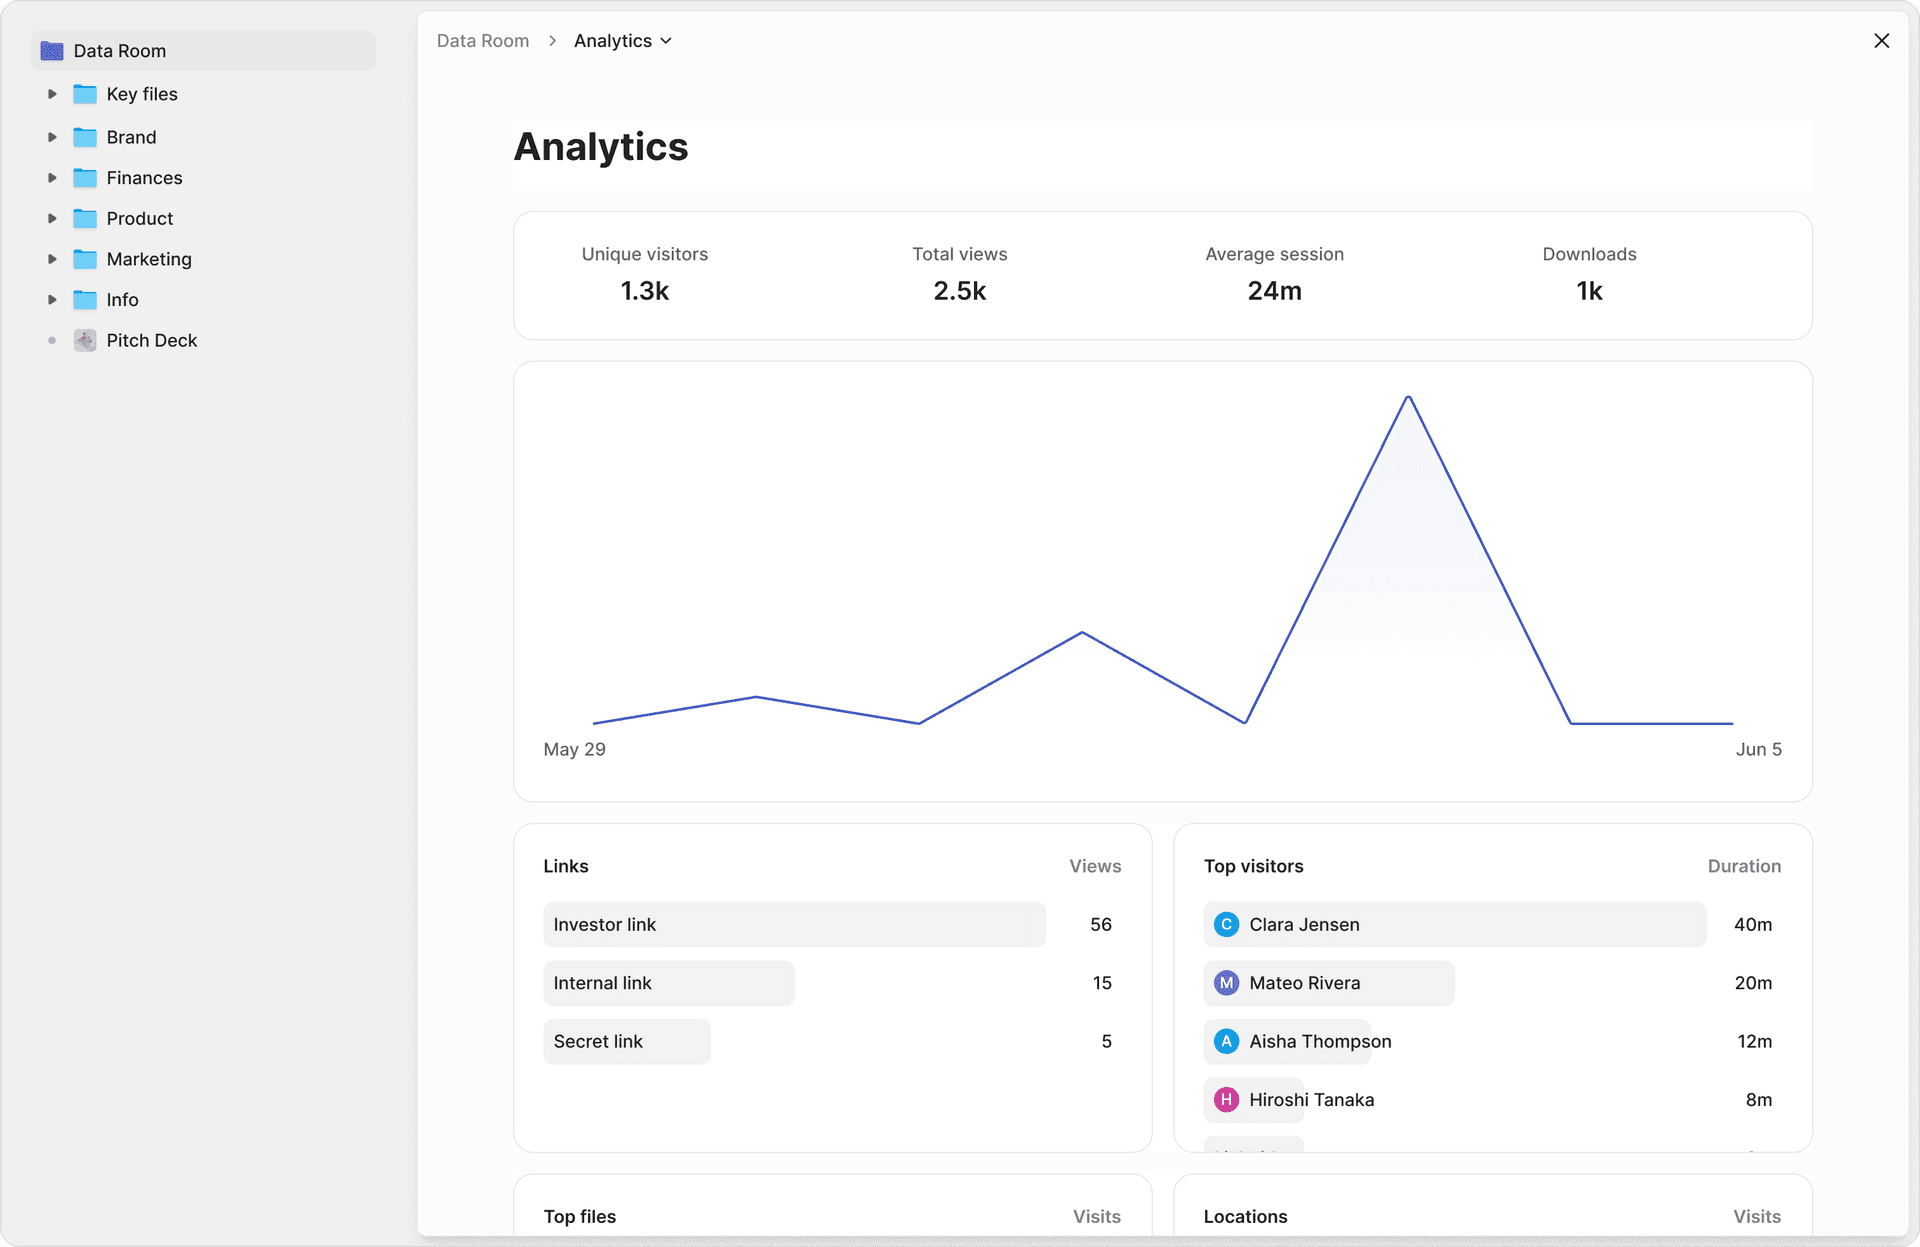
- Monitor access: page-level analytics show exactly who viewed each file, how long they spent on every page, and whether they returned for a second look.
- Revoke instantly: one click to shut down access for a specific viewer or the entire room — even after someone has already viewed the files.
If you update a file, replace it in Peony behind the same link. Everyone sees the latest version. No more "v7_final_FINAL.pdf" chaos.
What I actually see when someone views my files
This is the part that changed my workflow. After sharing a pitch deck through Peony, I can see:
- Which investor opened it, and when
- How long they spent on each page (the financial model got 4 minutes, the team slide got 12 seconds — useful signal)
- Whether they came back for a second review
- Whether anyone attempted a screenshot (blocked and logged)
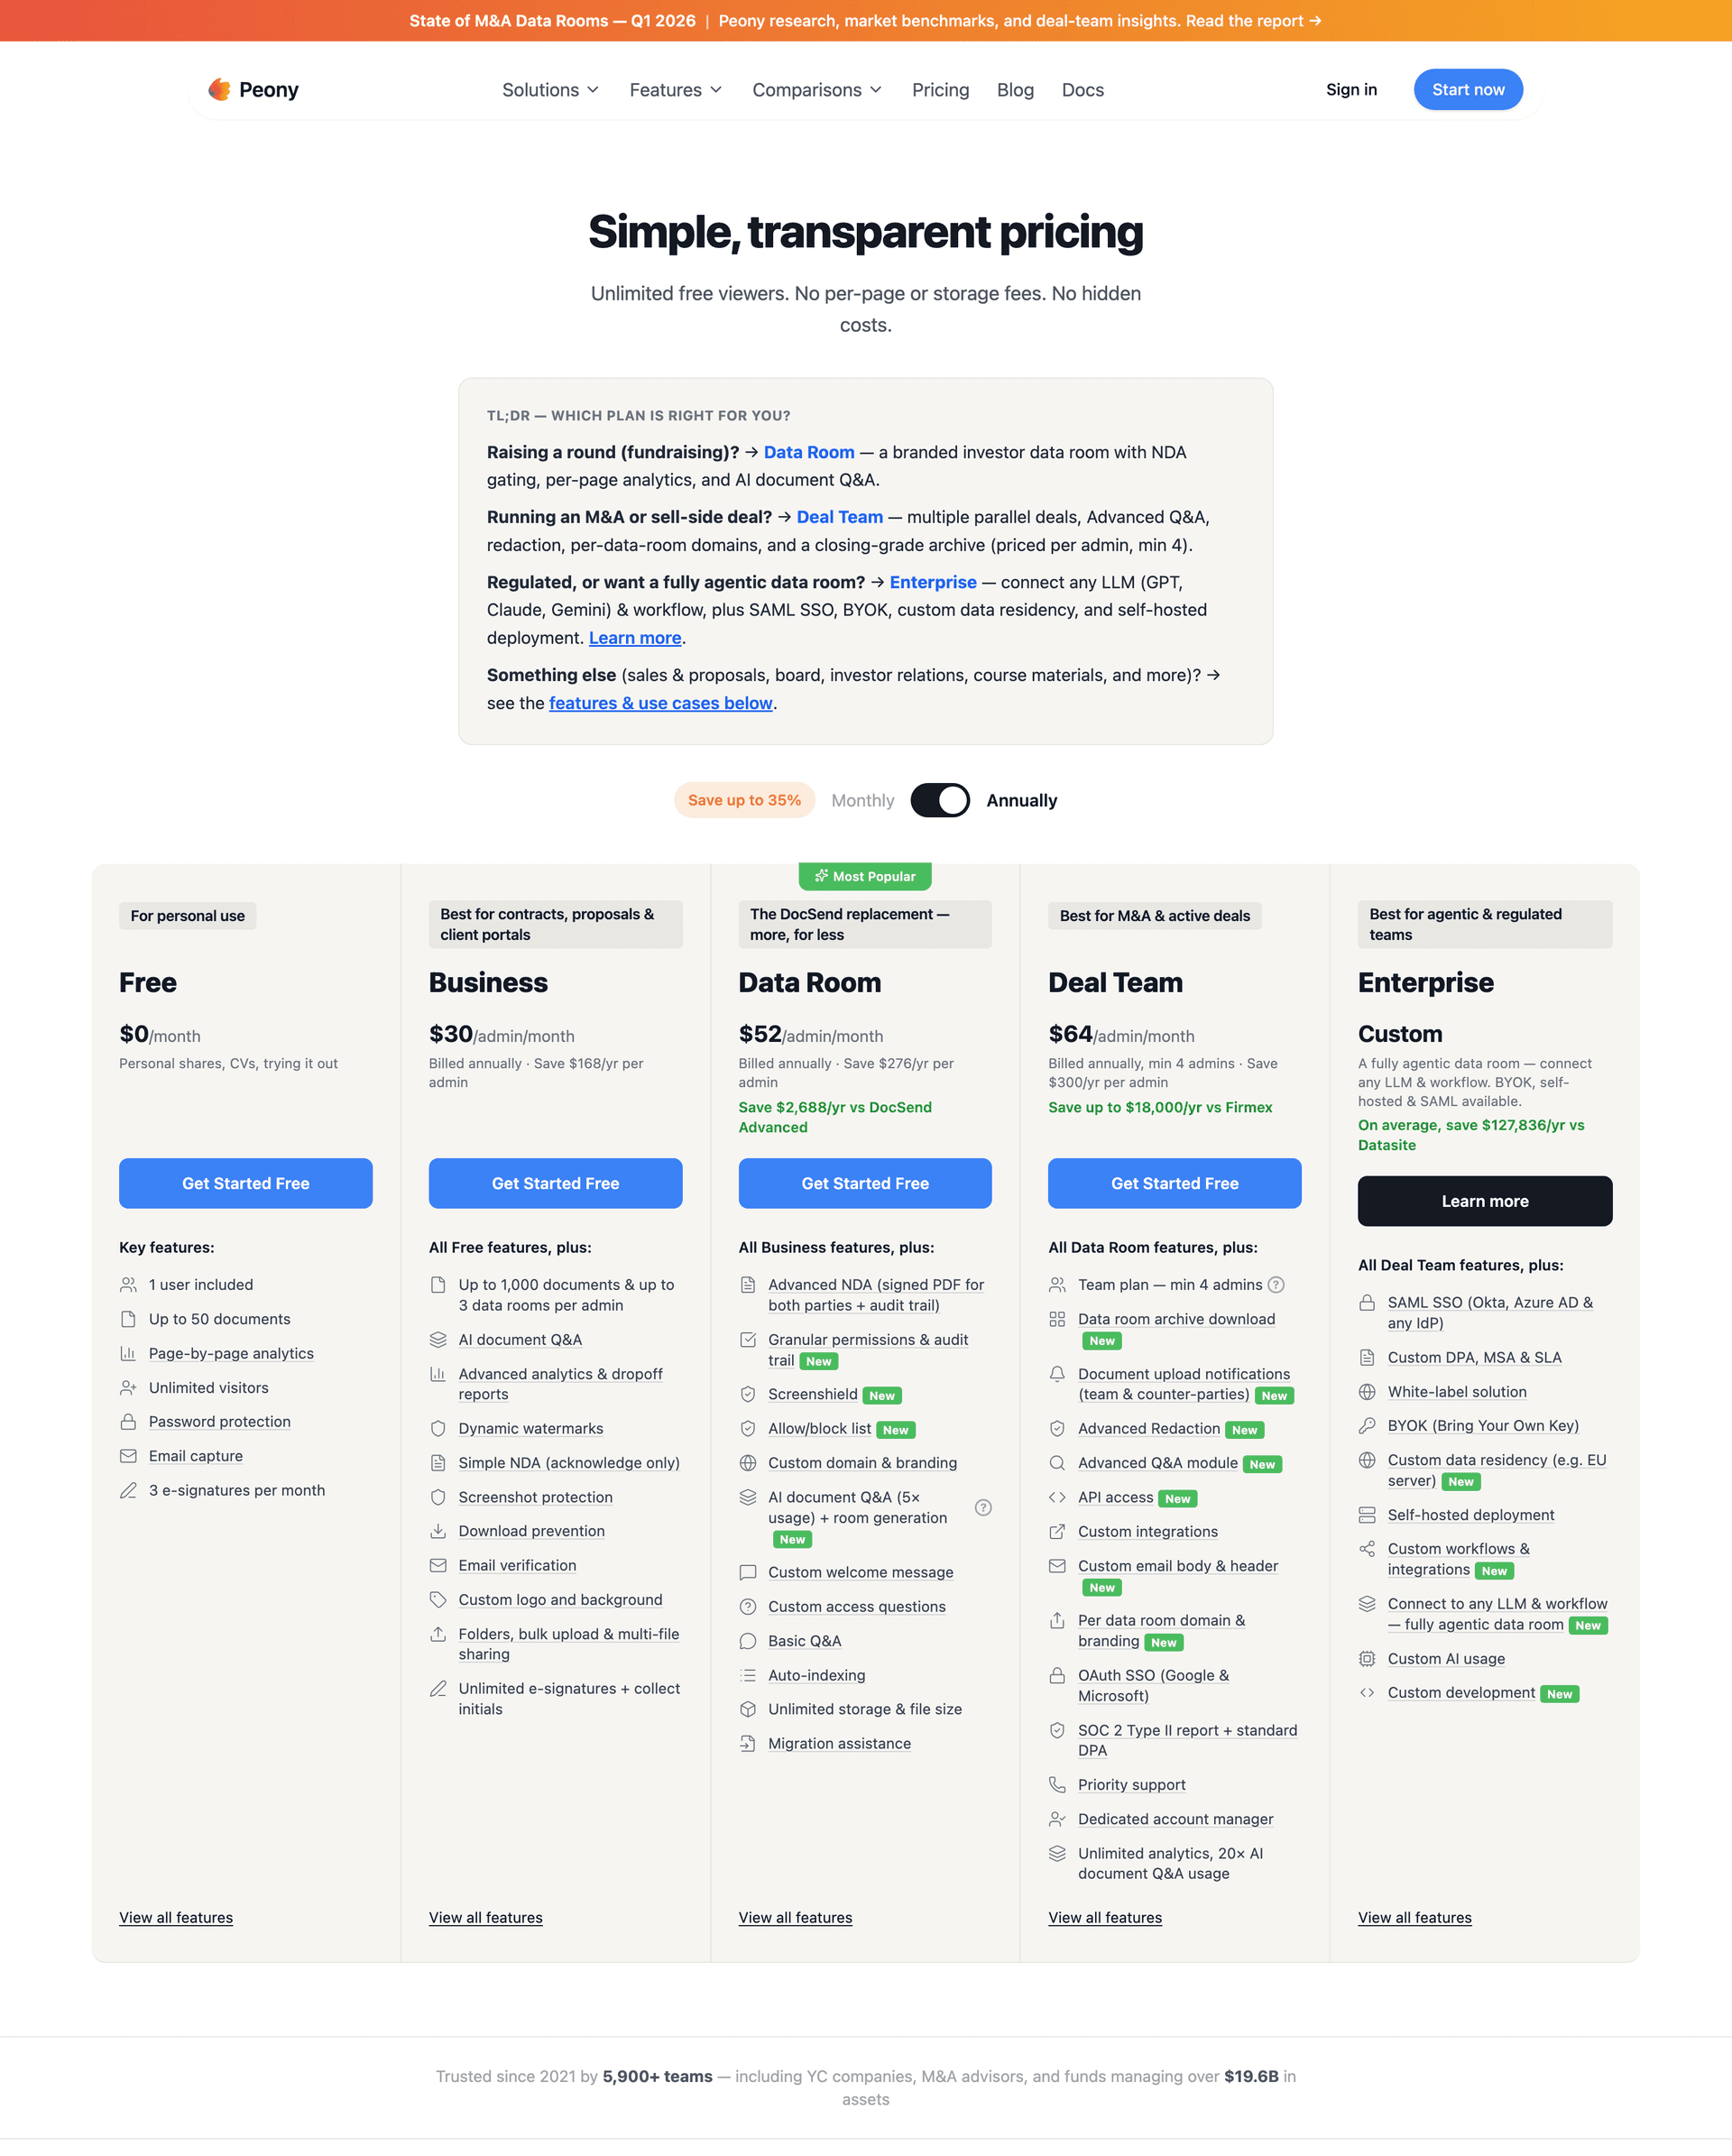
Pricing
Peony has a free tier that covers most individual workflows. Business is $30/admin/month, and Data Room is $52/admin/month. Compare that to emailing an encrypted ZIP and hoping for the best.
Pros
- Free tier available
- Identity-bound access — no password sharing needed
- Page-level analytics — per-viewer, per-page engagement data
- Screenshot protection — blocks and logs attempts
- Dynamic watermarks — viewer identity in every frame
- One-click revocation — instant access cutoff
- AI auto-indexing — organizes uploaded documents in under 3 minutes
- E-signatures built in with AI field detection
- No Mac software to install — runs in the browser
Cons
- Requires an internet connection (it is a cloud-based sharing platform)
- Not a local encryption tool — does not replace FileVault or encrypted disk images for at-rest protection
- File viewers see documents in Peony's secure viewer, not their native app
Best for
Any file that leaves your Mac: investor decks, M&A documents, client deliverables, due diligence files, HR documents, real estate transaction files, or anything where you need to know who accessed it and retain the ability to cut off access.
Method Comparison
| Feature | FileVault | Disk Image | Preview PDF | ZIP/7z | Peony |
|---|---|---|---|---|---|
| Cost | Free | Free | Free | Free | Free |
| Encryption | XTS-AES-128 (256-bit key) | AES-128 or AES-256 | AES | ZipCrypto or AES-256 | AES-256 + TLS 1.3 |
| Scope | Full disk | Folder/bundle | Single PDF | File bundle | Shared files |
| Requires download | No | No | No | Keka for AES-256 | No (browser) |
| Per-viewer tracking | No | No | No | No | Yes |
| Access revocation | No | No | No | No | Yes |
| Dynamic watermarks | No | No | No | No | Yes |
| Screenshot protection | No | No | No | No | Yes |
| Works offline | Yes | Yes | Yes | Yes | No |
| Protects after sharing | No | No | No | No | Yes |
Bottom line: For local file protection on your Mac, FileVault plus encrypted disk images cover nearly every scenario — and they are free. For files you share with anyone outside your Mac, Peony is the only method here that gives you tracking on the free tier, with access revocation and screenshot protection on the Business plan ($30/admin/month) and watermarking on the Data Room plan ($52/admin/month). The free tier handles most individual sharing workflows.
By the Numbers
- ~60% of data breaches involve the human element — weak passwords, misdelivery, bad access settings, credential theft (Verizon 2025 DBIR, analyzing 22,052 incidents across 139 countries)
- $4.67 million — average cost of a breach involving stolen or compromised credentials (IBM Cost of a Data Breach 2025)
- 241 days — average time to identify and contain a data breach; organizations using AI and automation cut this by 80 days (IBM 2025)
- 100 million+ Macs in active use worldwide, part of Apple's 2.35 billion active device ecosystem (Apple Q1 FY2025 earnings)
- XTS-AES-128 with a 256-bit key — the encryption standard macOS FileVault uses on APFS volumes, as recommended by NIST (Apple Platform Security Guide)
- 1 in 10 sensitive files is exposed to every employee in the average organization — 157,000 exposed records per company (Varonis 2025 State of Data Security Report)
- 15 characters minimum — NIST SP 800-63B Revision 4 (August 2025) now mandates this for single-factor passwords, up from the old 8-character minimum (NIST SP 800-63B-4)
- 22% of breaches start with stolen credentials as the initial access vector; 88% of Basic Web Application attacks involve stolen credentials (Verizon 2025 DBIR)
Practical Tips
A few habits quietly put you in the top few percent of Mac users for security:
-
Always enable FileVault on every Mac with real data. It is built for exactly this and strongly recommended by Apple. On Apple Silicon, the performance impact is negligible.
-
Use long passphrases, not short clever passwords. NIST SP 800-63B-4 now mandates 15+ characters for single-factor authentication and explicitly says character-type composition rules (uppercase, number, symbol) are no longer required. Use a password manager.
-
Never send file and password in the same channel. If you use encrypted PDFs or ZIPs, email the file but send the password over a different medium (SMS, phone call, Signal). Better yet, use Peony's identity-bound access so no password sharing is needed at all.
-
Separate "local safety" and "sharing safety" in your mind.
- Local: FileVault + encrypted disk images protect you if your Mac or drive disappears.
- Sharing: Peony rooms (with password gating, identity verification, and revocation) protect you when files leave your Mac.
-
Encrypt external drives and Time Machine backups. Time Machine can encrypt backups natively — enable it in Time Machine settings. For portable SSDs, right-click the drive in Finder and choose "Encrypt."
-
Regularly audit where sensitive files live. Clean old copies out of Downloads, Desktop, and unencrypted external drives. Make Peony or an encrypted disk image the home base for anything you would hate to see forwarded.
Bottom Line
| Situation | What to do |
|---|---|
| Baseline Mac security | Turn on FileVault — it is free, built-in, and negligible on performance |
| Sensitive local folders | Create a 256-bit AES encrypted disk image in Disk Utility |
| Quick single-PDF protection | Use Preview to export with a password |
| Cross-platform file delivery | Use Keka for AES-256 encrypted 7z archives (avoid ZipCrypto) |
| Any file you share externally | Use Peony — the only method with tracking (free tier), plus revocation on Business ($30/admin/month) and watermarking on Data Room ($52/admin/month) |
| Investor decks and deal rooms | Use Peony data rooms with NDA gating, analytics, and AI auto-indexing |
You do not need to turn into a security engineer to do this well. FileVault for your disk, an encrypted image for your most sensitive folders, and Peony for anything that leaves your Mac. That is the whole system.
Frequently Asked Questions
How do you password protect files on Mac?
macOS has four built-in methods: FileVault for full-disk encryption, Disk Utility for encrypted disk images, Preview for password-protected PDFs, and Terminal or Keka for encrypted ZIP and 7z archives. For files you share externally, Peony adds identity-bound access, password gating, and page-level analytics starting free, with one-click access revocation on the Business plan ($30/admin/month).
Can you password protect files on Mac without installing software?
Yes. FileVault, Disk Utility encrypted images, Preview PDF encryption, and the built-in zip command all ship with macOS. No downloads needed. For secure external sharing with per-viewer tracking and screenshot protection, Peony runs entirely in the browser with no Mac software to install.
Does FileVault slow down a Mac?
On Apple Silicon Macs, the performance impact is negligible because encryption and decryption happen in dedicated hardware inside the Secure Enclave. On older Intel Macs with a T2 chip, the impact is similarly small. Apple explicitly recommends enabling FileVault on every Mac. For sharing files securely without any local performance impact, Peony handles encryption and access control in the cloud.
What encryption does macOS use for FileVault?
FileVault uses XTS-AES-128 encryption with a 256-bit key on APFS volumes, as recommended by NIST. On Apple Silicon Macs, the underlying Data Protection layer uses AES-256 in XTS mode with per-file keys, and all key handling occurs in the Secure Enclave. Peony uses AES-256 encryption for documents at rest and TLS 1.3 in transit.
Can you see who opened a password-protected file on Mac?
No. macOS password-protected files, encrypted disk images, and encrypted ZIPs provide zero access logs after sharing. Once you email the file and share the password, you cannot see who opened it, when, or whether they forwarded it. Peony provides page-level analytics showing exactly who accessed each file, how long they viewed every page, and whether they attempted screenshots.
How do you password protect a folder on Mac?
Open Disk Utility, choose File then New Image then Image from Folder, select your folder, choose 128-bit or 256-bit AES encryption, and set a password. This creates an encrypted disk image that mounts like a drive when you enter the password. For sharing folders externally, Peony lets you upload an entire folder to a secure data room with password gating, identity verification, and per-viewer analytics.
Is encrypting a ZIP file on Mac secure?
The built-in zip -er command uses legacy ZipCrypto encryption, which is considered weak by modern standards. For stronger encryption, use Keka or another 7-Zip compatible app to create AES-256 encrypted archives. For sharing sensitive files, Peony provides stronger security than any encrypted archive because it adds identity-bound access, revocation, dynamic watermarks, and screenshot protection.
What is the most secure way to share files from a Mac?
The most secure approach layers multiple controls: identity-verified access, password gating, dynamic watermarking with the viewer's name in every frame, screenshot blocking that logs attempts, and link expiration, all starting free. Peony adds instant access revocation on the Business plan ($30/admin/month), so you never have to email raw files or share passwords over a second channel.
Related Resources
- How to Password Protect Files on Windows (5 Ways)
- How to Password Protect PDF Without Adobe
- How to Password Protect Multiple PDFs at Once
- How to Password Protect ZIP Files
- Secure File Sharing Guide
- How to Password Protect a Video (7 Methods)
- How to Password Protect Google Docs
- How to Password Protect Excel Files
- How to Password Protect PowerPoint
- Password Protect CSV Files
- Virtual Data Room Guide
You might also like
Mar 27, 2026
How to Password Protect Files on Windows (BitLocker Isn't Enough) in 2026
Jun 17, 2026
How to Password-Protect an HTML File in 2026 (5 Methods, Ranked)
Jun 4, 2026
Which Virtual Data Room Works in China? A Global-Access Guide (2026)