
NDA Gates: Signed Before Access
Require viewers to electronically sign an NDA before they can open any file in a Peony data room. Signed copies land in the Signatures view with full audit trail.
Last updated October 2, 2026
NDA gates require a viewer to electronically sign a non-disclosure agreement before they can access any file in a data room. Peony captures the signature, timestamp, IP address, and a full audit trail. The signed NDA is stored in the Signatures view in the left navigation of your home screen.
Use Peony's built-in template or upload your own attorney-drafted NDA. Signatures are designed to meet the US ESIGN Act and EU eIDAS requirements for standard e-signatures; see Legality.
When to Use an NDA Gate
Use an NDA gate when the cost of a leak is higher than the friction of asking a viewer to sign:
- Fundraising. Pitch decks, financial models, or cap tables with investors you don't have a pre-existing relationship with.
- M&A diligence. Sell-side advisors gate the full data room so every prospective buyer is on record before seeing customer lists, employee data, or pricing.
- Licensing and IP. Technology licensing, patent portfolios, exclusive distribution discussions.
- Any external share where IP or financials matter. Board packets, consultant engagements, supplier cost data.
If the file is already public (one-pager, published white paper, marketing deck), an NDA gate adds friction without protection.
How to Enable an NDA Gate
Open your data room's Permissions tab, pick the group you want to gate, and find One-click NDA in the Security control row — it sits alongside password protection, expiry, and dynamic watermarks, and ships Off.
Because the gate is set per group, strategics, lenders, and sponsors can each be handed a different agreement out of the same room.
Clicking the tile opens the Require NDA dialog. It's a dropdown with three modes. Setting an NDA needs Business+; the Advanced (e-signature) mode needs Data Room+.
- No — no NDA required (default).
- Standard — upload-and-acknowledge NDA. After you pick Standard, two buttons appear: Upload file (upload your own NDA as a PDF or DOCX) and Use sample NDA (start from Peony's default mutual NDA). The viewer reads the NDA and ticks a single checkbox before viewing the data room. Peony records email, name, timestamp, and IP. No signature and no fields to fill in, so it is simple and fast.
- Advanced — e-signature NDA. After you pick Advanced, two buttons appear: Select template reuses an agreement you have already built, and Upload template uploads a new NDA and opens it in the template editor. The viewer must read the full NDA, fill in every field you set up for them in the template (name, title, address, date and so on), and e-sign with a drawn or typed signature. Peony generates a verification hash, stores the signed PDF in the Signatures view, and emails both you and the signer a copy. Use this for anything that might end up in front of a lawyer.
| Standard NDA | Advanced NDA | |
|---|---|---|
| What the viewer does | View and agree only: reads the NDA and ticks one checkbox | E-sign: reads the NDA, signs it, and fills in every field you set up |
| Signature | None | Drawn or typed signature |
| Fields to fill | None | Every field you marked for the signer, such as name, title, address and date |
| What Peony records | Email, name, timestamp, IP | Signature, filled-in fields, timestamp, IP, verification hash |
| Signed PDF | No | Yes, emailed to you and the signer |
| Email to you when someone accepts | No | Yes, Agreement signed with the PDF and audit log |
| Plan needed | Business+ | Data Room+ |
Both modes block access until the viewer completes the NDA step. Share the link normally — viewers see the NDA prompt before any file loads.
We have example sample data rooms for you to experience both modes
Open the Standard sample to read and agree with one checkbox, or the Advanced sample to fill in the fields and e-sign before the room opens.
Test with a second email address
Peony may skip the NDA step for admin views, so testing from your own admin email may not show the gate. Open the link with a second email address instead.
Creating a Signature Template
The Advanced flow needs an e-signature template first, and it only shows up under Advanced → Select template if it's built for a single signer, with every field assigned to that one recipient. For the step-by-step editor walkthrough, see Build a Signature Template.
Upload the NDA as a DOCX, not a PDF
What you upload decides how much Peony does for you. A PDF is a flat page, so Peony can't detect anything in it: you drag every field onto the page yourself. A DOCX (Word) is read automatically. Peony finds the placeholders already in the document, such as Initial, State, Date, or a party's legal name, and turns each one into a named field the viewer fills in, so the whole NDA is ready for the Advanced flow in one pass. Check the fields afterwards and fix any it read differently from what you meant. See Upload a DOCX and let Peony find the blanks.
Upload template takes the agreement through four stages, all inside the template editor:
- Upload the NDA
- Make it fillable
- Set up each field
- Continue to NDA settings
Making it fillable means placing fields: drag them onto a PDF, type / to insert one inline, or let a DOCX's placeholders become fields on upload. Clicking any field opens its settings: Label (the instruction the signer reads), Assignee (who fills it in), Type (Text, Date or Signature), Set value (pre-fill anything you already know, such as your own entity name) and Is required. Each party carries its own color, and every field assigned to them is drawn in it. For an NDA gate, every box should be the recipient's color. A field left in another color is the most common reason a template never shows up under Select template.
When every field is placed and assigned, click Continue to NDA settings in the top right. The agreement is saved as a reusable template, so the next room you gate picks it from Select template instead of building it again.
The editor can also rewrite the agreement itself: select any text for a formatting toolbar that includes Input (turn the selection into a fillable field) and AI Edit (rewrite the clause in place). Every control is covered in Build a Signature Template.
Viewer Experience
The two modes ask the viewer for different things before the room opens (compared in the table above).
Standard NDA: view and agree only
The viewer opens your link and lands on a branded page titled "Please enter your info to continue". They enter their email and name, click Read non-disclosure agreement to open the full text, then tick "I have reviewed and agree to the terms of this Non-disclosure agreement" and click Continue. That is the whole step: a single checkbox, with no signature and nothing else to fill in.
Advanced NDA: e-sign and fill in the fields
The viewer lands on a branded page showing "Please sign the NDA". They enter their name, click "Read and sign non-disclosure agreement" to open the agreement, and do two things beyond acknowledging it:
- Fill in every field the admin set up in the template. Text and date fields you left for the counterparty (for example their legal name, title, address or the signing date) must be completed by the viewer. Fields you pre-filled with Set value are already done, and a field marked Is required blocks submission until it has been filled in.
- E-sign with a drawn or typed signature. If the template has initial fields, they initial those as well.
They then click Continue to enter the data room. A "Document integrity verified by Peony" badge appears at the bottom. Peony captures the signature image, the filled-in fields, timestamp and IP, and emails a signed copy to both you and the signer.
Inside the agreement, every field the admin set up appears as a pink box. Required fields are marked with an asterisk, a counter at the top tracks progress (for example 0/13 fields), Next field jumps to the next blank, and Submit sends the signed agreement once everything is filled in.
Before the signature can be confirmed, the visitor ticks the checkbox I agree to using e-signature for this agreement. Until it is ticked, the Confirm button stays grey. If a visitor says Confirm is grey and won't click, this is the first thing to check.
Access granted
The moment the viewer completes the NDA step, the data room loads with watermarks and any other security layers already active.
The flow adds roughly 30-60 seconds to the viewer's first visit. Subsequent visits on the same link don't require re-signing.
Where Signed NDAs Are Stored
Signed NDAs live in the Signatures view — in the left navigation of your home screen, not inside the data room itself. Every signed copy lands there automatically.
Open Signatures from the home screen to see the status of every NDA across all your data rooms in one place — filter by All, In progress, Signed, For me, or Drafts.
The Signatures view shows:
- Signer email
- Timestamp (with timezone)
- IP address at signing
- Link to download the signed PDF (Advanced / e-signature flow)
- Status — Draft, In progress (sent but not yet signed), or Signed
Search, date filtering, CSV export, and bulk "download all" for the Signatures view are on the roadmap. For now, you can browse the list and download individual signed PDFs. To see which room a signed NDA belongs to, open that room's Analytics tab. For audit or legal exports today, contact support via the Crisp widget.
To bulk-delete old agreements after a deal closes, contact Peony support via the Crisp widget.
Why Standard NDAs Can't Be Exported, but Advanced Can
Standard has no signing step — every viewer reads and acknowledges the exact same document, so there's no per-viewer copy to export. If you want recipients to be able to download the NDA itself, put the file in the data room rather than (or alongside) the NDA gate.
Advanced requires each viewer to e-sign, so Peony generates a distinct signed copy per signer. The moment someone signs, Peony automatically emails a copy of the signed PDF plus the audit log to both you and the signer — no manual export needed.
The Emails You Get When Someone Signs
Standard NDA sends no email when someone accepts
A Standard acceptance is a checkbox, not a signature, so Peony sends you no email when a visitor accepts it. To see who has accepted, check the room's Analytics tab, or keep visitor notifications on to get an email each time someone opens the link. If you want an email every time someone signs, use Advanced.
On Advanced, each signature sends an Agreement signed email from verify@notification.peony.ink, saying all parties have signed and naming them. Two PDFs are attached: the signed agreement and its audit log.
The audit log is the evidence file. It carries the envelope ID, each time the signer viewed the agreement and for how long, the moment they signed, a hash of the signed document and the signature itself, and when the document was signed by all parties:
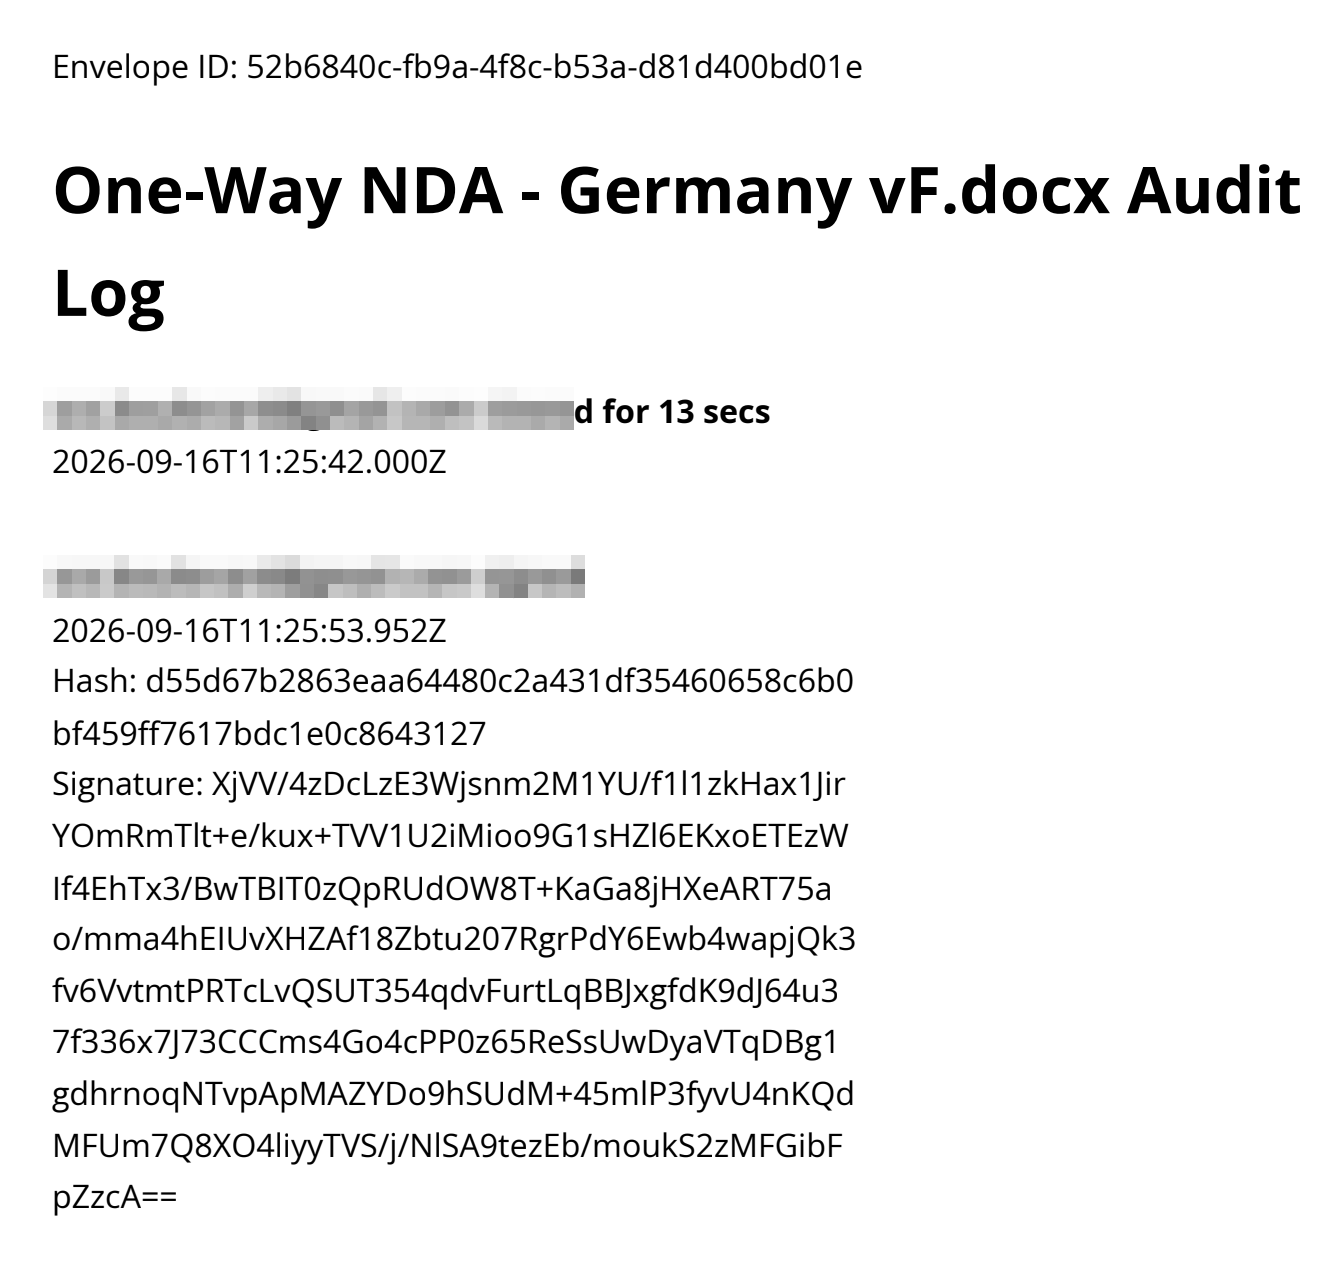
Separately, you also get a view notification when a visitor opens the agreement, naming them by email, if visitor notifications are on. See What a Notification Shows.
Add a Second, Stricter NDA for Your Most Sensitive Files
One room-wide NDA covers ordinary diligence material. Some files need more: engineering drawings, source code, formulas, pricing a competitor must never see. For those, keep the room NDA as layer one and put a second, stricter agreement in front of only that material, signed before it opens. Everyone can still see that the material exists; nobody reaches it without the second signature.
This is built from standard controls, not a single switch. The second gate uses Advanced NDA, so it needs Data Room+.
- Move the sensitive files into their own data room. Keep them out of the main room entirely, so there is no path to them that skips the second agreement.
- Gate that room with the stricter agreement. Create a group for it, require email verification, and set One-click NDA to Advanced with your trade-secret or clean-team agreement as the template, not the room NDA.
- Tighten the group. Turn on dynamic watermarks and set the files to View so they can't be downloaded. Add a link expiry that matches the process.
- Point to it from the main room. In the main room, add a clearly labelled section, for example "Trade secrets: additional agreement required", and put that room's link in it with Create new → Web link.
Every signer of the second agreement gets their own signed PDF in the Signatures view, and the second room's analytics show exactly which pages they opened. Together that is the record that a named person was told the material was confidential and agreed to extra terms before seeing it. For the full reasoning and worked examples, see the two-layer trade-secret workflow and the clean team data room guides. Have your counsel confirm the agreement language.
NDA + Other Access Controls (Layered Security)
On its own, an NDA gate is a legal deterrent — a signed agreement that gives you recourse if something leaks. It does not prevent screenshots, downloads (if enabled), or phone photos.
Layer it with other controls:
- NDA gate — legal deterrent, signed agreement, audit trail
- Dynamic watermark — identity on every page (email, timestamp, IP)
- Screenshot protection — blocks capture on desktop browsers (Chrome, Edge, Firefox, Safari on macOS/Windows). Enable Screenshield Data Room+ to make capture harder on iOS, iPadOS, and Android.
- Email verification — confirms the viewer is the intended recipient
- Link expiry — time-limits access
- Downloads disabled — prevents local copies
Recommended combinations:
- Fundraising — NDA + watermark + email verification. The right trade-off between protection and friction; heavier stacks will cool off investor interest.
- M&A diligence — NDA + watermark + screenshot protection + email verification + downloads disabled. Stack all five.
- Licensing/IP — NDA with full e-signature + watermark + screenshot protection + link expiry (30-90 days).
For hard protection against extraction, combine disabled downloads + screenshot protection + NDA gate.
Common Questions
Can I use my own NDA template?
Yes. For Standard, choose Upload file and drop in a PDF or DOCX. For Advanced (e-signature), build a template first: Home → Create new, upload your NDA, add one recipient, drag and assign the signature fields, then Create template. Upload it as a DOCX if you can: Peony detects the placeholders in a Word file and makes them fillable fields automatically, while a PDF needs every field placed by hand. Your template appears under Advanced → Select template.
How do I turn off the NDA on an existing room?
Open the room's Permissions tab, find the group, and open its settings. Set One-click NDA back to No and save. The NDA requirement is per group, so turning it off on one group doesn't affect the others.
I only see 3 templates (or none) in the Advanced dropdown — is there a limit?
No. The picker only lists single-signer templates; see Templates for the One-Click NDA for the rules and what to send support.
What if a viewer declines?
No access. Because they never sign, no signed version is created — nothing shows as Signed in the Signatures view. An in-flight attempt appears as In progress until it's completed.
Can one signed NDA apply to multiple rooms?
By default, NDA acceptance is scoped to the specific link. For workspace-level inheritance, contact support about enterprise configuration.
Is the e-signature legally binding?
Yes, as a standard e-signature under the US ESIGN Act and EU eIDAS. See Legality for what Peony records.
Can I see who signed but never opened any files?
Yes. Cross-reference the Signatures view (who signed) with the room's Analytics tab (who opened files). Useful for spotting investors who collect decks but don't engage.
Can I send the same NDA to 100 people?
Yes. Set an NDA template on the link, then share with as many recipients as needed. Each signed copy lands in Agreements separately. No cap.
Does the signed NDA come back to me or only to the counterparty?
Both — on the Advanced (e-signature) flow. You get it in the Signatures view plus an email notification, and the counterparty gets their own emailed copy with the audit log. On Standard (acknowledge-only), there's no signed PDF to send. If you expected a downloadable copy and didn't get one, switch the gate to Advanced.
Where do I go to send an e-signature outside of an NDA gate?
From the Home screen, click Create new. See E-Signatures for the full agreements workflow, extra fields, initials and plan limits.
"Failed to sign NDA. Unexpected error" when I test it — what's wrong?
A known glitch, not a paid gate. Contact support if you hit it; details are in the E-Signatures FAQ.
My NDA has a verification code that overlaps the signature area — can that be moved?
The hash is part of the signature record and can't be removed. For non-standard signature block positions, contact support and they can reposition the signature field to avoid the overlap.
Can I require the NDA for only one folder, while the rest of the room stays open?
Put the NDA-only material in a separate data room with its own NDA gate, then add that room's link to the main room with Create new → Web link. Visitors browse the main room freely and sign the NDA only when they open the protected room. The same setup adds a second, stricter agreement on top of a room NDA; see Add a Second, Stricter NDA. Alternatively, give NDA-signed visitors their own group with access to that folder — see Permissions: view, download, upload.
Can existing investors skip the NDA while new ones have to sign?
Yes. The gate is set per group, so put investors already covered by a master confidentiality agreement in a group with One-click NDA set to No, and new or prospective investors in a group set to Standard or Advanced. Both groups can see the same folders.
We added new bidders mid-process. Will the bidders who already signed be asked again?
No, as long as you leave their group alone. Create a new group for the new bidders with the NDA switched on and share that group's link. The existing groups keep working through their original links. Only changing the NDA settings on a group makes that group's visitors sign again.
I changed the NDA settings. Do visitors have to sign again?
Yes. After you change or switch on an NDA, visitors are asked to sign the current version the next time they open the room.
Can two people from the same company sign the NDA once for both?
No. Each visitor signs with their own email address, so every person who opens the room has their own signed record.
Common Mistakes
- Uploading an unsigned NDA template and expecting Peony to fill it in. You need to place and assign signature fields manually before the template is ready.
- Building a multi-signer template and wondering why it's missing from the Advanced dropdown. See Creating a Signature Template.
- Forgetting to turn on the NDA on the group. NDA gates are per group. Creating a template doesn't gate anything automatically — set One-click NDA to Standard or Advanced in the group's settings.
- Assuming NDA gates block downloads. They don't. An NDA gate only prevents access before signing. Pair with downloads disabled, watermarks, and screenshot protection.
- Using one link for multiple investors. You lose per-viewer analytics and can't revoke one investor without touching the rest. Use one link per investor or group.
- Relying on the NDA alone for high-stakes data. An NDA is a legal deterrent, not a technical control. Pair with watermarks and screenshot protection.
Related Features
- Dynamic Watermarks — identity attribution on every page
- Screenshot Protection — block capture on desktop browsers
- Access Control Layers — overview of how Peony's security stack fits together
- Share a Data Room Link — link and group settings where NDA gates are turned on
- E-Signatures — build and reuse signature templates and send documents for signature